Call Google APIs with OAuth 2.0 HTTP request
In Make, you can call Google APIs with the HTTP > Make a request module. Since Google APIs use the OAuth 2.0 protocol for authentication and authorization, you will need to select the OAuth 2.0 authentication type when configuring your connection.
For details on required APIs, scopes, and connection settings, refer to the API documentation of the specific Google service you are using. You can find it in the Google APIs Explorer.
To call Google APIs with the HTTP > Make a request module, you need to:
Create and configure a Google Cloud Platform project
To connect Make to Google services using your custom client credentials, you need to create and configure a project in the Google Cloud Platform.
Create a Google Cloud Platform project
Log in to the Google Cloud Platform using your Google credentials.
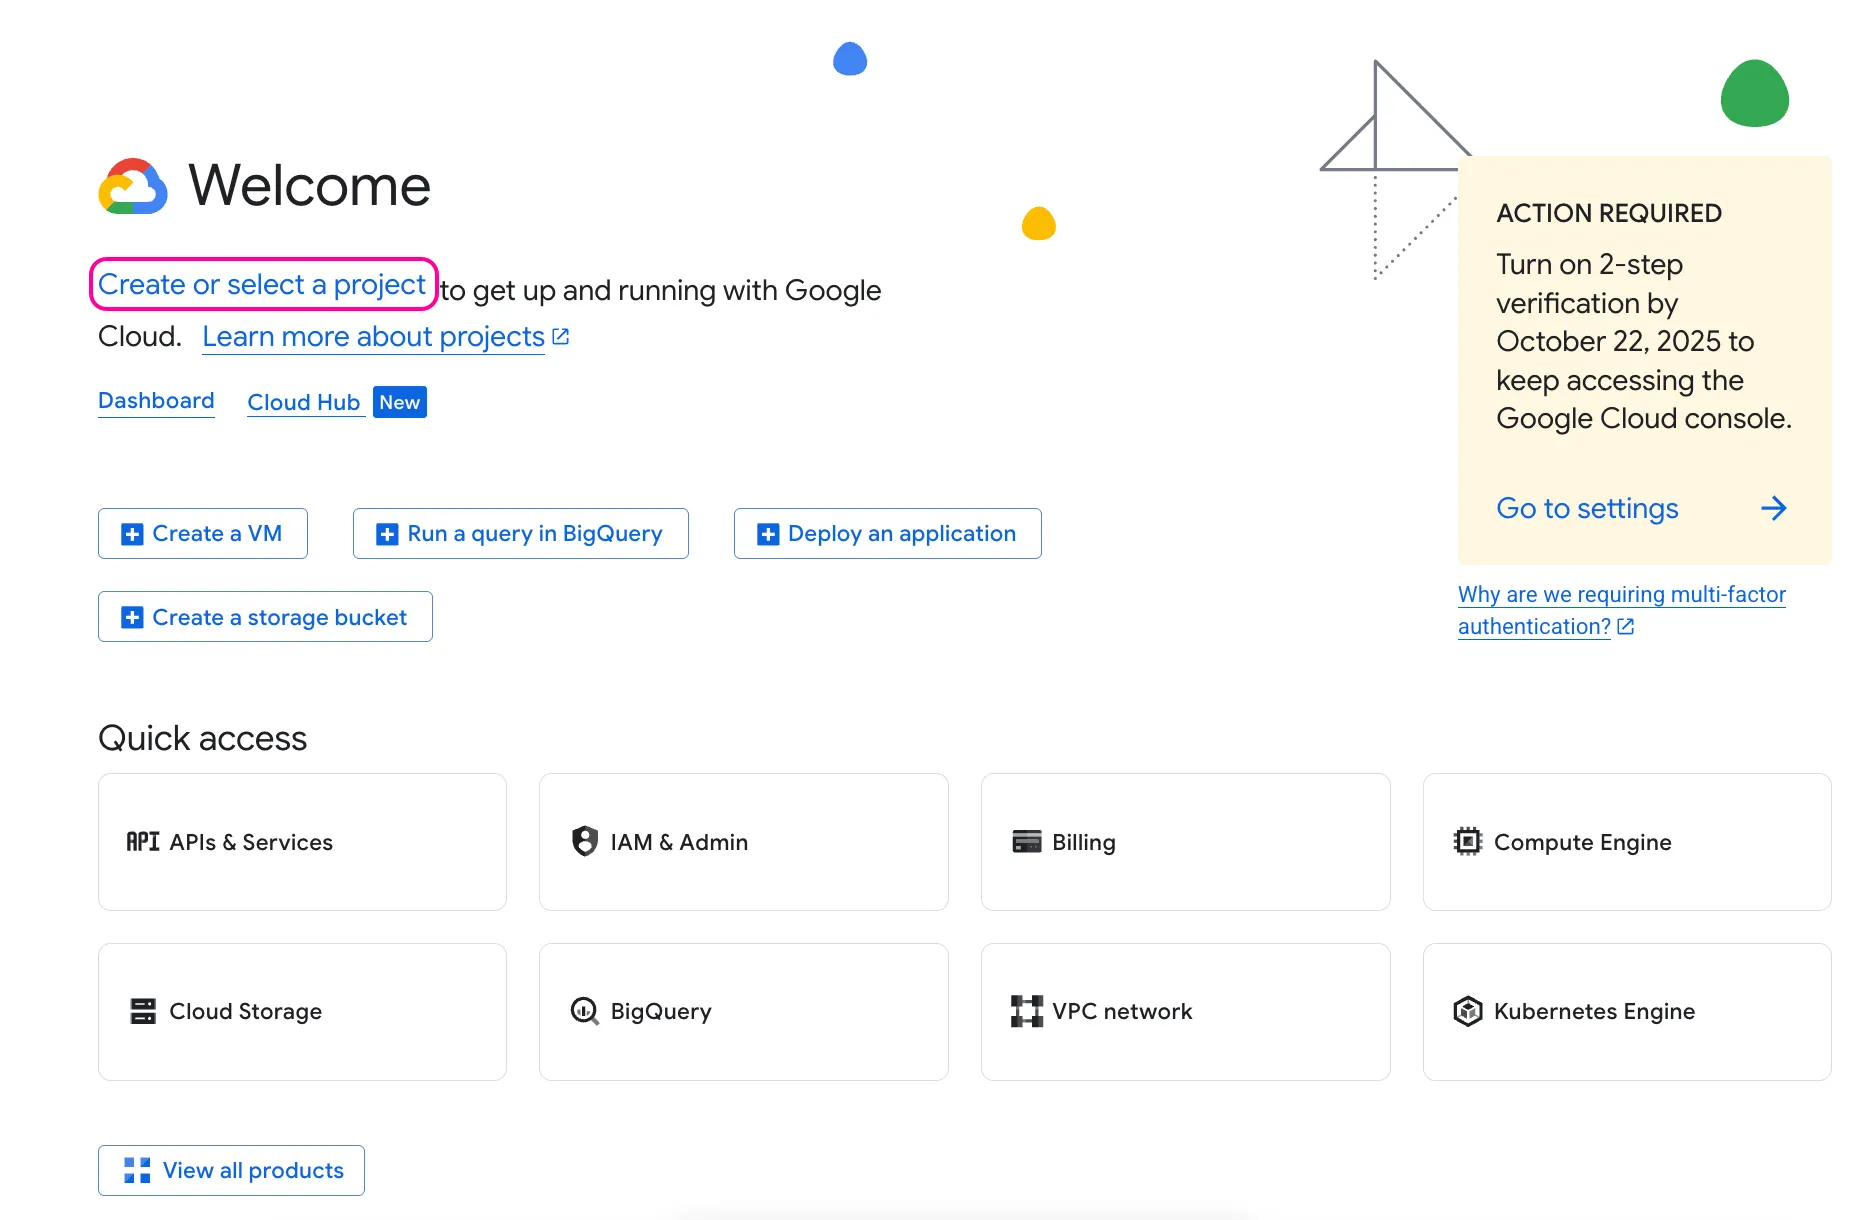
On the welcome page, click Create or select a project.
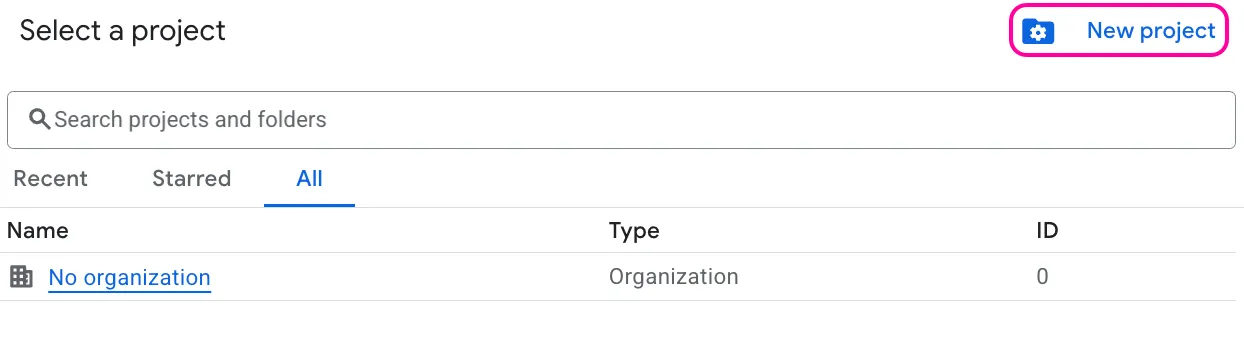
In the next window, click New project in the upper-right corner.
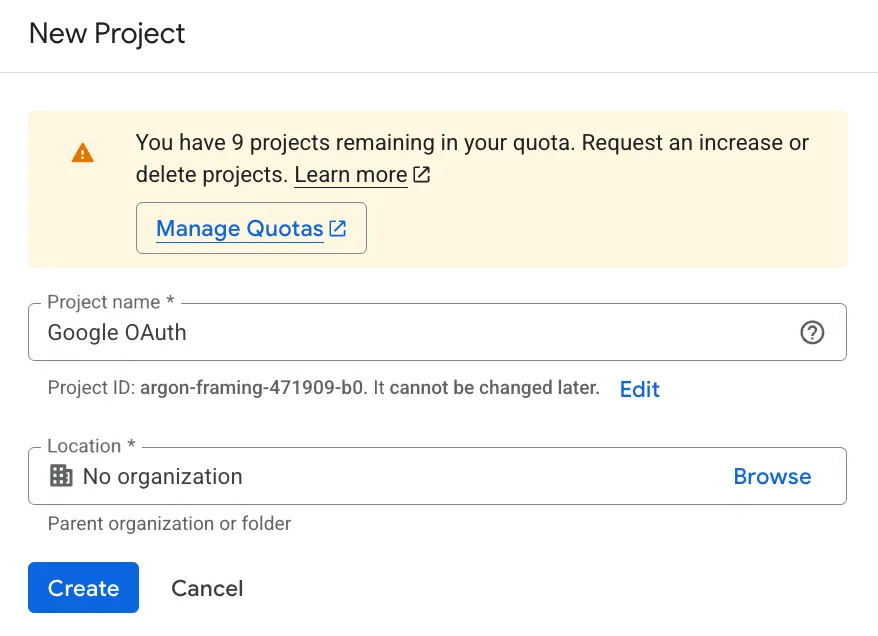
Change the default Project name and Project ID, if needed. Select the Location for your project, and click Create.
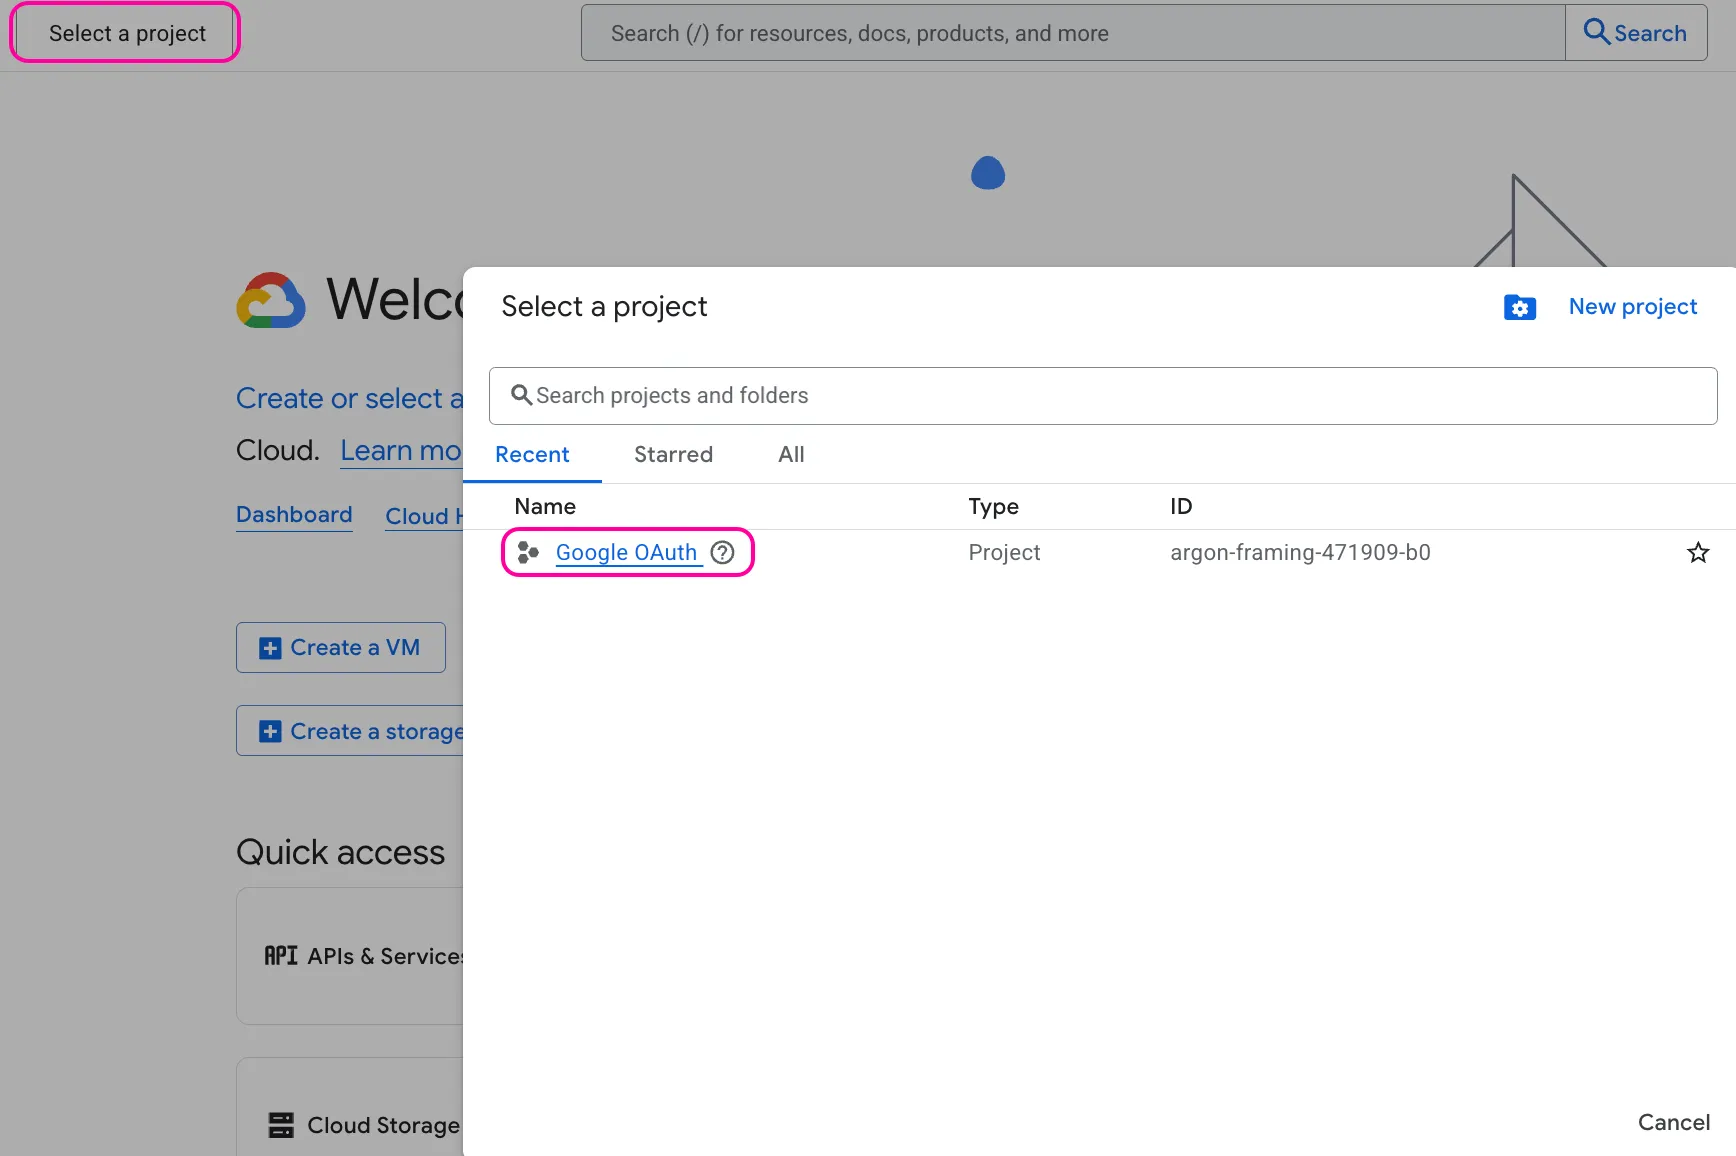
On the top panel, next to the Google Cloud logo, click Select a project.
In the next window, click the project you just created.
You'll now see the Google Cloud Platform project you've created on the top panel, next to the Google Cloud logo.
To create a new project or work in the existing one, you need to have the serviceusage.services.enable permission. If you don’t have this permission, ask the Google Cloud Platform Project Owner or Project IAM Admin to grant it to you.
Enable APIs
In the left sidebar of the Google Cloud Platform, click APIs & Services > Library.
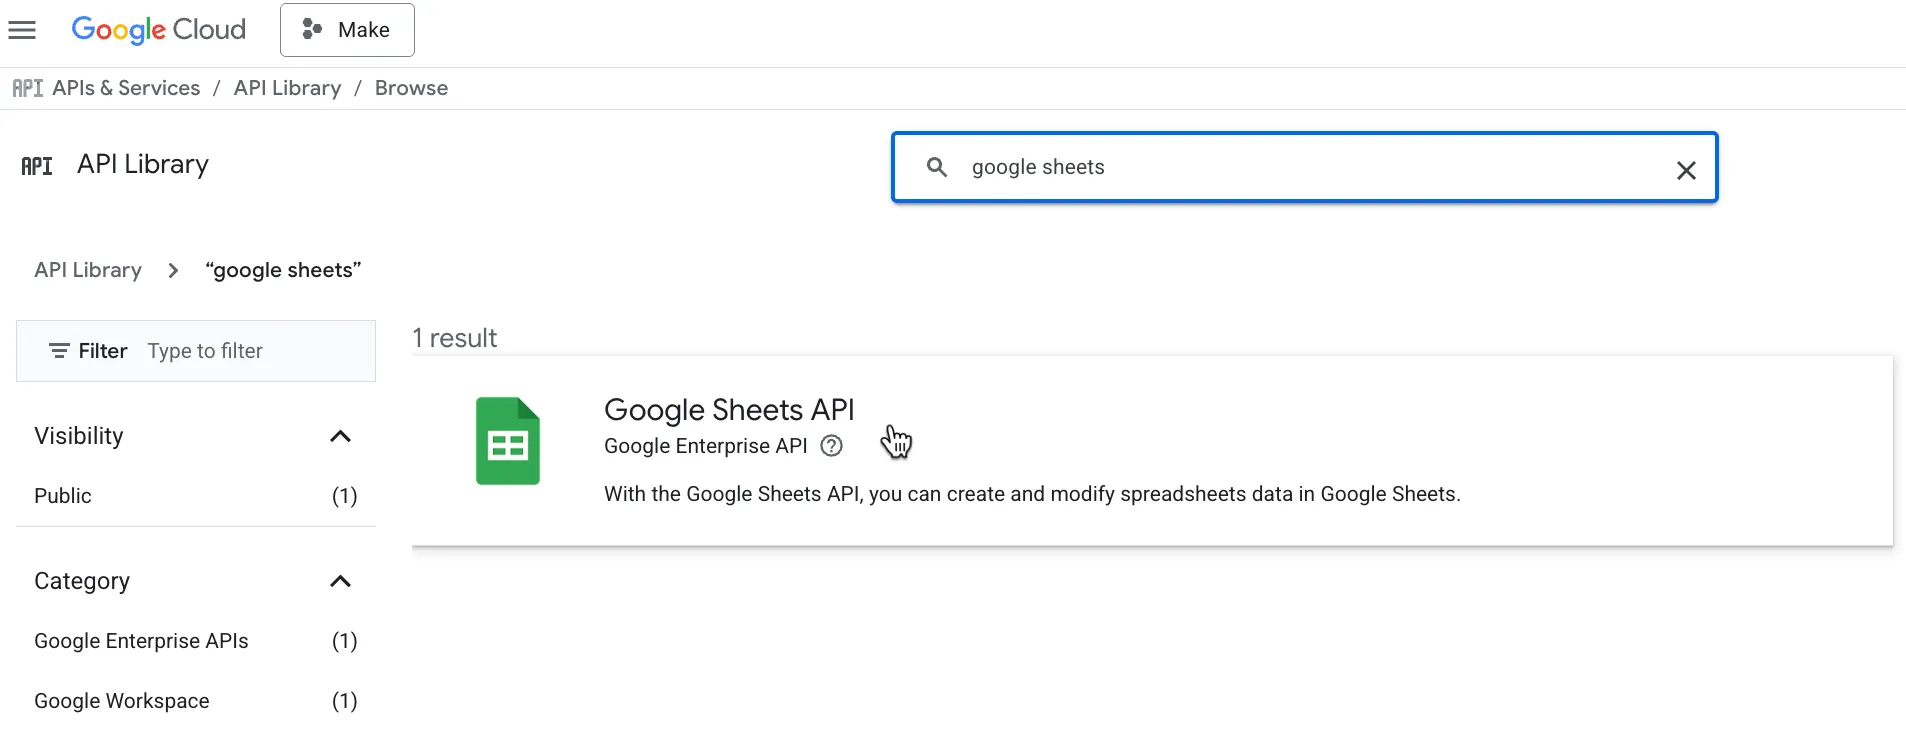
Search for the API you need for your project (e.g., Google Drive, Google Sheets, etc.).
Click the relevant API. For example, Google Sheets API:
Click Enable.

Your API is now enabled.
Configure your OAuth consent screen
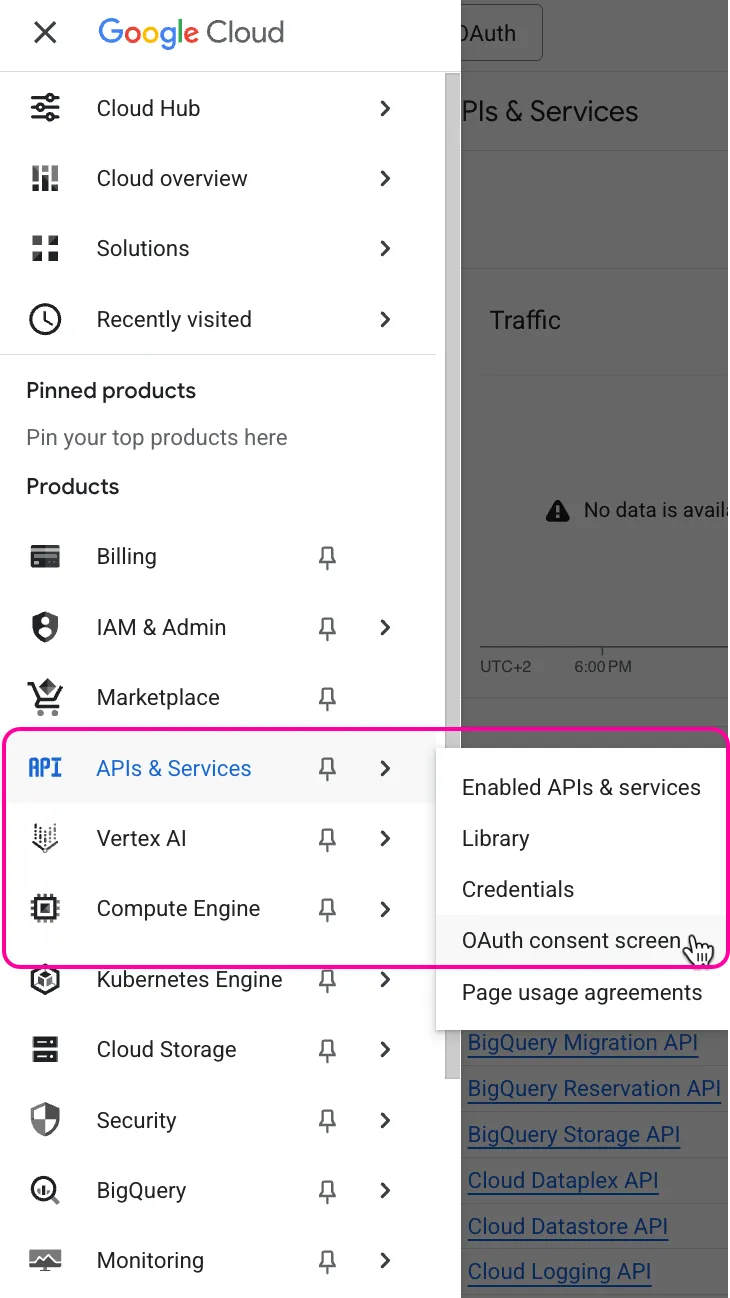
In the left sidebar of the Google Cloud Platform, click APIs & Services > OAuth consent screen.
Click Get Started.
In the Overview section:
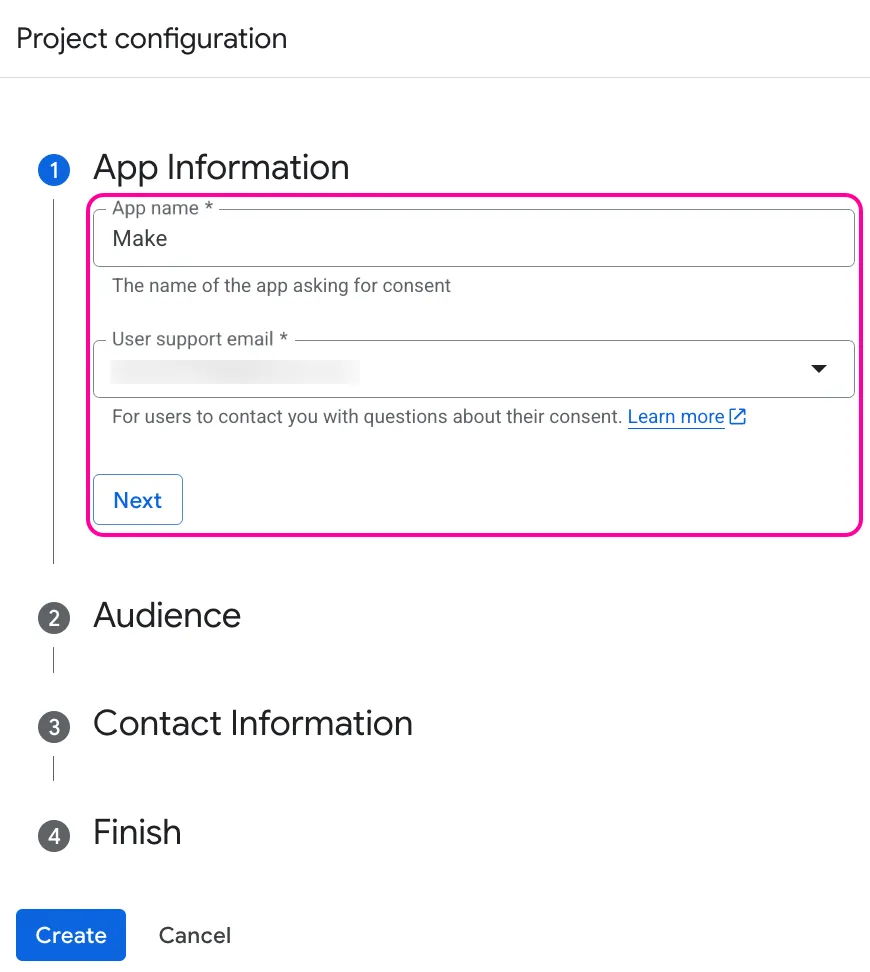
- Under App information, enter Make as the app name, enter your Gmail address, and click Next.
- Under Audience, select External, and click Next. For more information regarding user types, refer to Google's Exceptions to verification requirements documentation.
- Under Contact Information, enter your Gmail address, and click Next.
- Under Finish, agree to the Google API Services User Data Policy, and click Continue, then Create.
- In the next window, click Create OAuth Client.

- You'll be redirected to the Clients tab. You can skip it for now or refer to the Create your client credentials section to configure it.
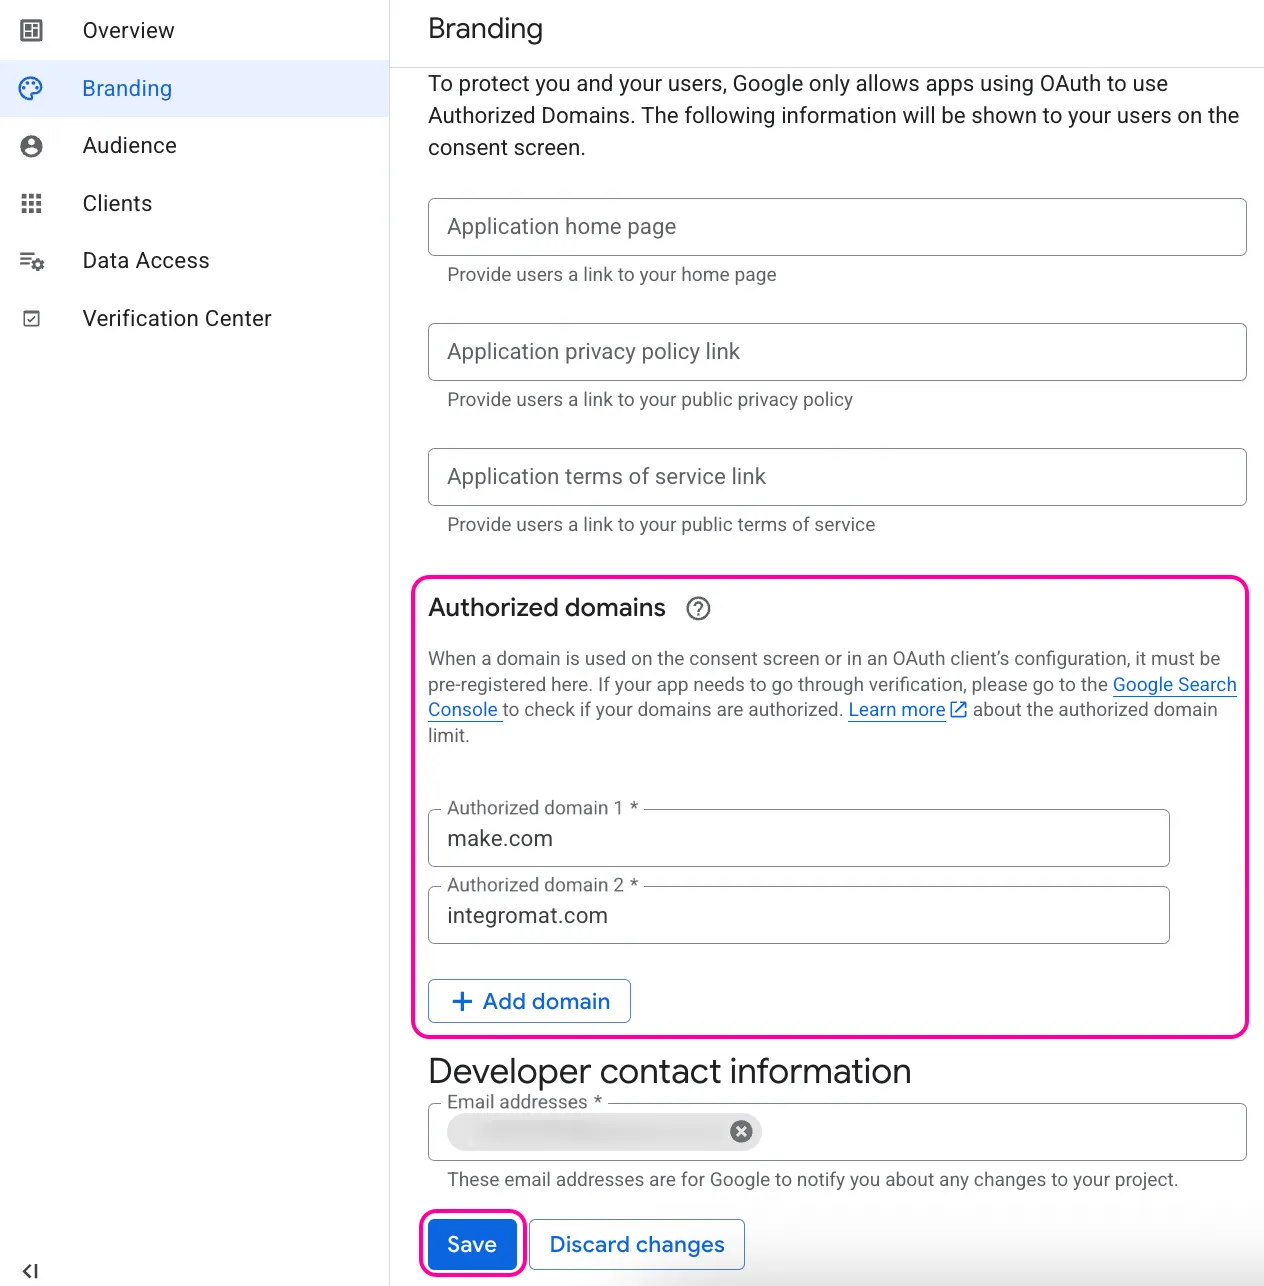
In the Branding section:
- Under Authorized domains, click +Add domain.
- Add make.com and integromat.com.
- Click Save.
In the Audience section:
- Click Publish app to update the project status to In production.
- If you want the project to remain in the Testing publishing status, click +Add users and enter your Gmail address under Test users.
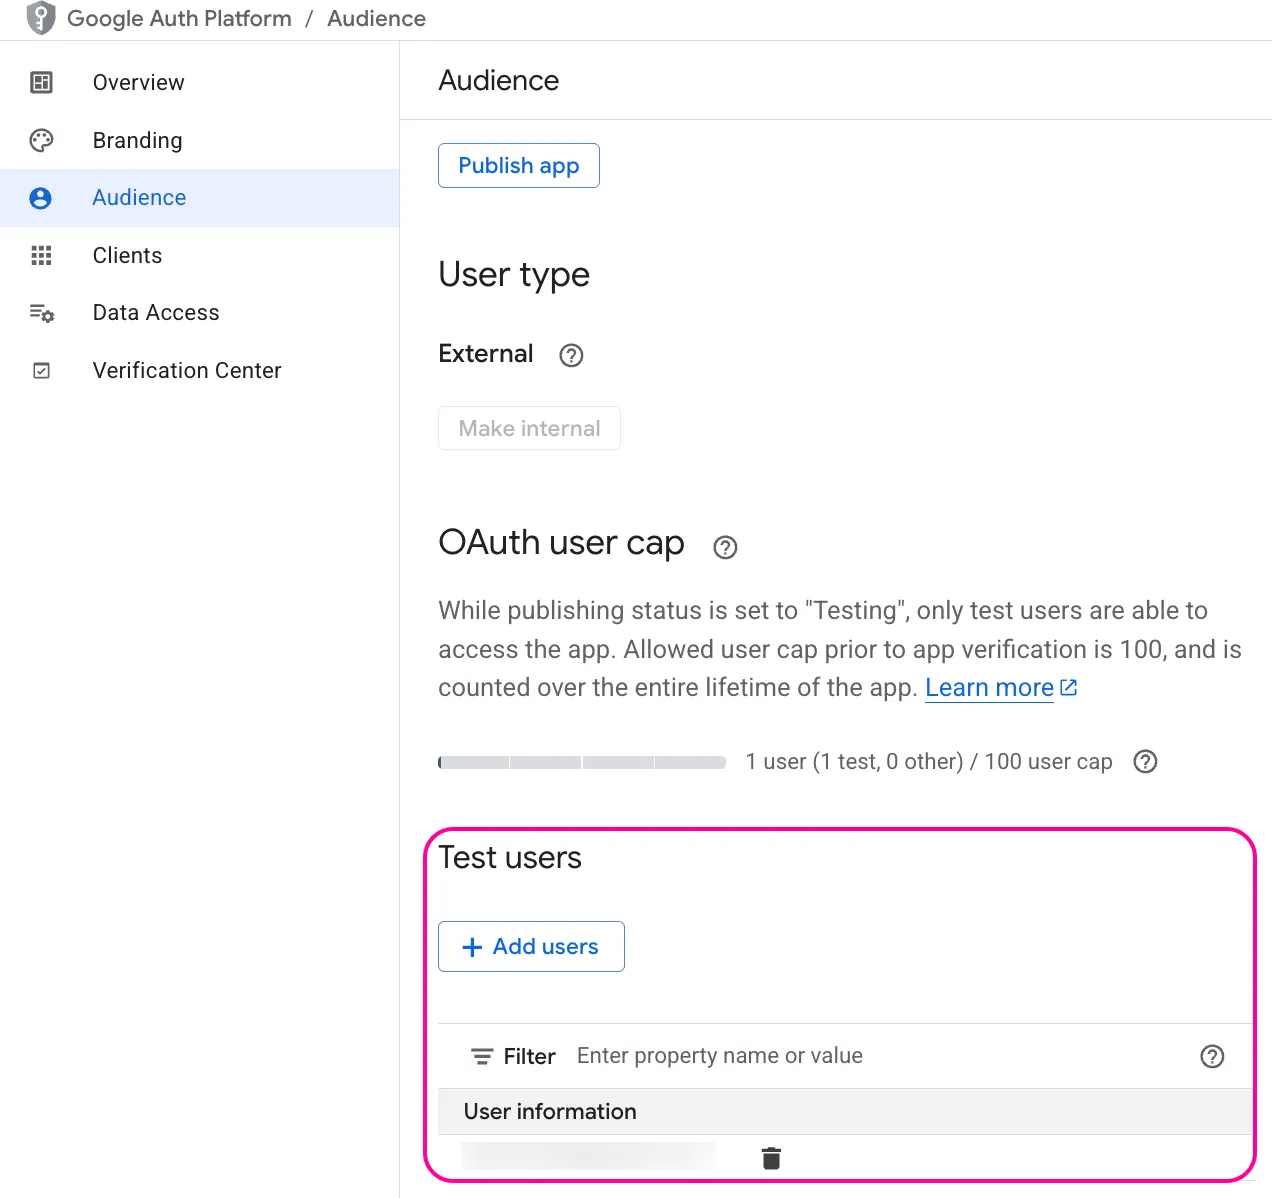
Publishing Status
Testing: If you keep your project in the Testing status, you will be required to reauthorize your connection in Make every week. To avoid weekly reauthorization, update the project status to In production.
In production: If you update your project to the In production status, you will not be required to reauthorize the connection weekly. To do that, go to the Google Auth Platform, the Audience section, and click Publish app. If you see the notice Needs verification, you can choose whether to go through the Google verification process for the app or to connect to your unverified app. Currently, connecting to unverified apps works in Make, but we cannot guarantee that Google will allow connections to unverified apps for an indefinite period.
For more information regarding the publishing status, refer to the Publishing status section of Google's Setting up your OAuth consent screen help.
Your OAuth consent is now configured.
Create your client credentials
In the left sidebar of the Google Cloud Platform, click APIs & Services > OAuth consent screen.
Go to the Clients section, and click +Create client.
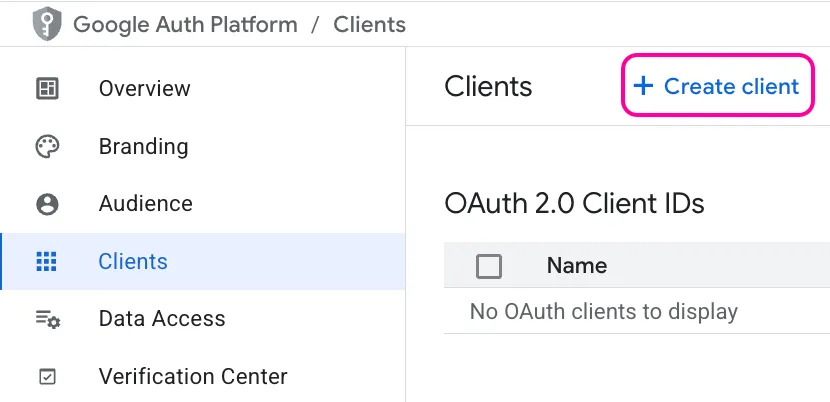
Under Create OAuth client ID:
- In the Application type dropdown, select Web application.
- In the Name field, update the name of your OAuth client. This will help you identify it in the console afterward.
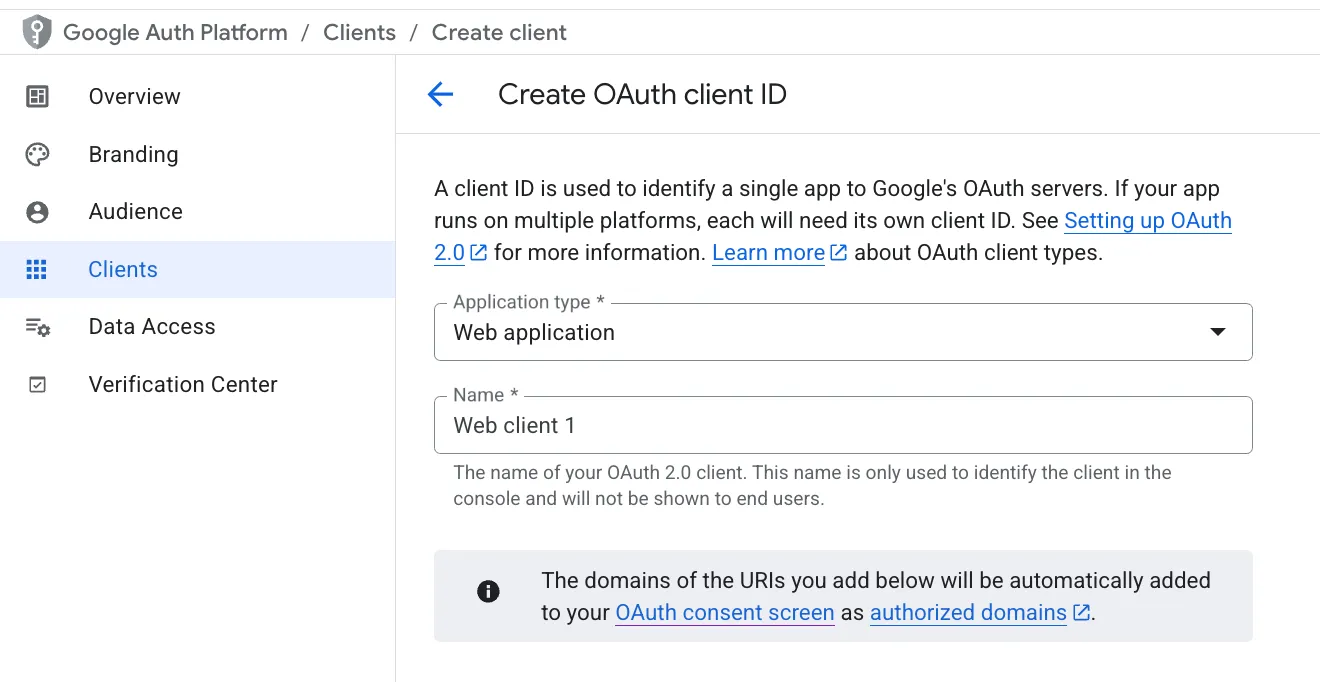
Under the Authorized redirect URIs, click + Add URI. Enter: https://www.integromat.com/oauth/cb/oauth2 and click Save.
This redirect URI is required to use the HTTP > Make a request module in Make.

Click Create.
You'll see a message that the OAuth client has been created. Copy your Client ID and Client secret values, and store them in a safe place.

You will use these values in the Client ID and Client Secret fields in Make.
Establish the OAuth connection in Make
To establish the connection in Make:
Log in to your Make account .
Create a new scenario or open an existing one and add an HTTP > Make a request module to your scenario.
In the Authentication type field, select OAuth 2.0.
In the Credentials field, click Create a connection (or Add next to Create a connection) to create your OAuth 2.0 connection:
- In the Connection name field, enter a name to distinguish your connection.
- In the Flow type field, select Authorization Code as you'll need to enter further both an Authorize URI and Token URI.
- In the Authorize URI field, enter the Authorize URI as it's defined in the Google API documentation: https://accounts.google.com/o/oauth2/v2/auth
- In the Token URI field, enter the Token URI as it's defined in the Google API documentation: https://oauth2.googleapis.com/token
- In the Scope field, click +Add item to add the scopes required for your HTTP request.
You can check the scopes in the Google service's API documentation. For the Google Sheets API scopes, for example, you can use:
- https://www.googleapis.com/auth/drive
- https://www.googleapis.com/auth/spreadsheets
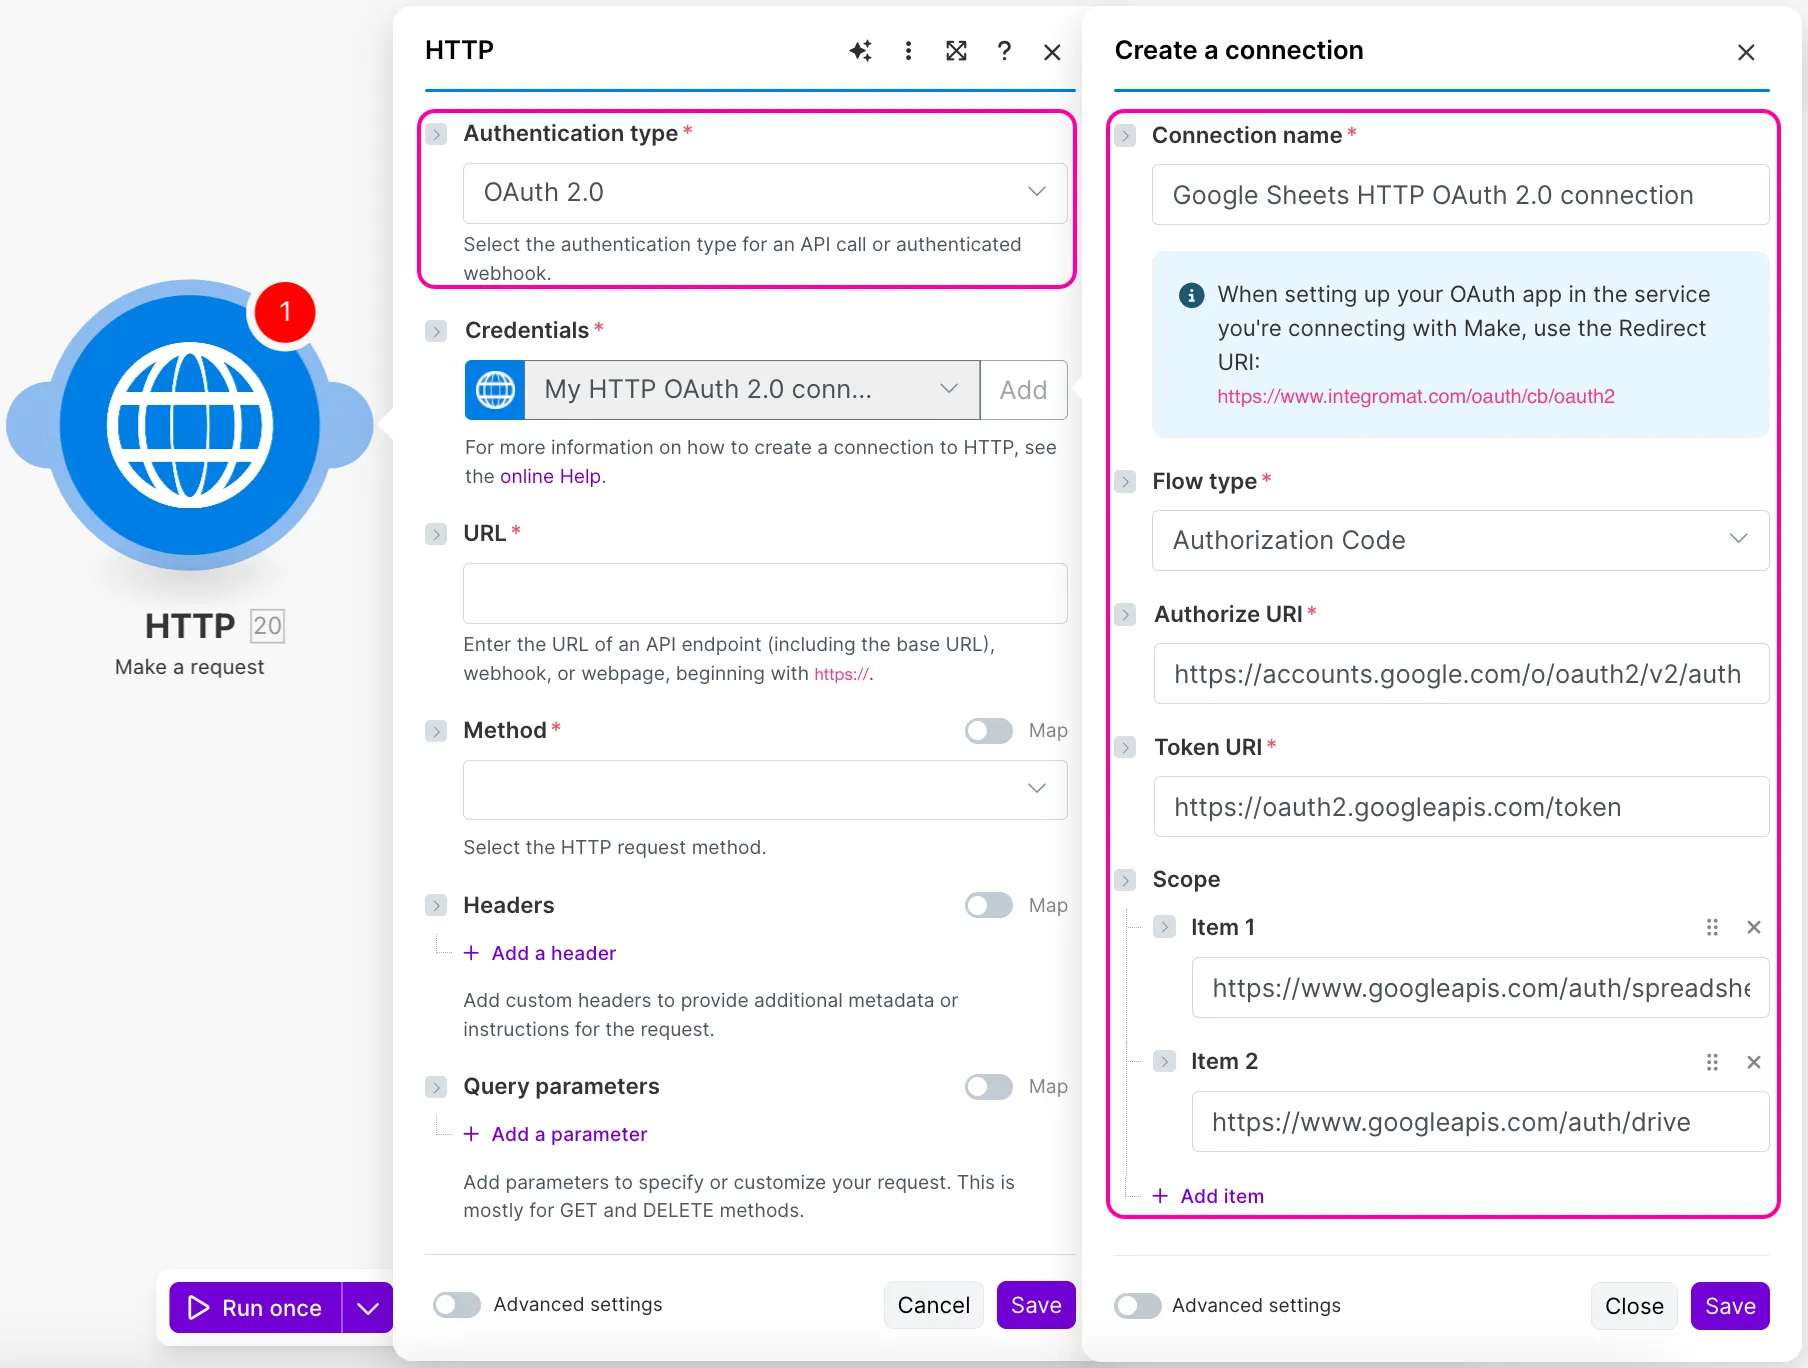
- In the Client ID field, add the Client ID you obtained from your Google Cloud Platform project app.
- In the Client Secret field, add the Client Secret you obtained from your Google Cloud Platform project app.
- Enable the Advanced settings toggle, and select SPACE in the Scope separator field.
Choosing the right scope separator is important, as the wrong one can prevent you from establishing the connection.

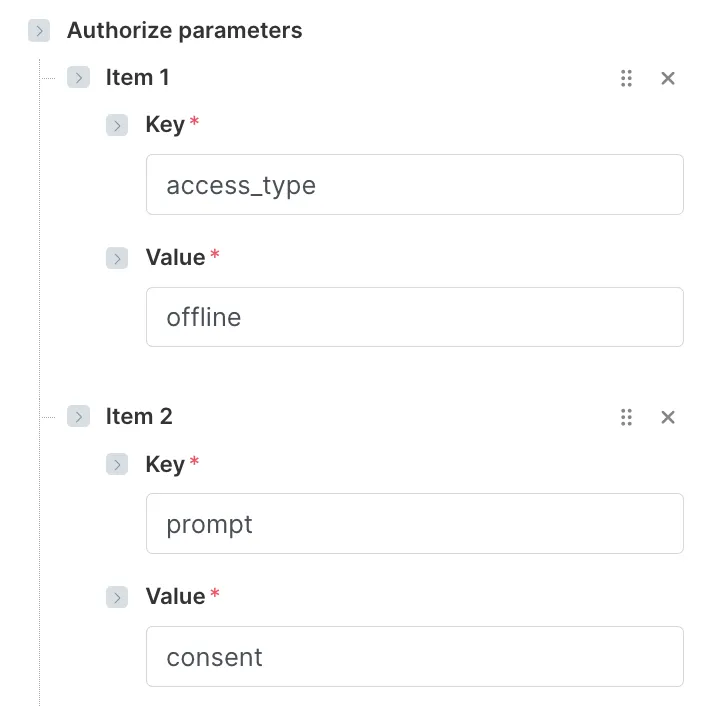
- To avoid having to constantly refresh the connection, in the Authorize parameters, click +Add item and add:
- Key: access_type Value: offline
- Key: prompt Value: consent
- Click Save.
Complete the required steps to sign in to Google. If you see a message that Google hasn't verified your app, you'll need to confirm that you trust the developer:
- Click Advanced.

- Click Go to integromat.com (unsafe).

Then, if prompted, authenticate your account, grant all requested permissions, and confirm access.
You've successfully created the OAuth 2.0 connection and can now make the HTTP request to a Google app.
You can edit the connection at any time. To do that:
- Open Connections from the left sidebar.
- Find the required connection, click the three dots next to its name, and click Edit.
You will be able to add or remove scopes and edit some other connection parameters.
Configure the HTTP module to send the request
To make an HTTP POST request to the Google Sheets API to create a spreadsheet:
In the URL field, enter the URL according to the desired output. To create a spreadsheet, for example, you would use: https://sheets.googleapis.com/v4/spreadsheets
Select the POST method required for this API call.

Leave the Headers and Query sections empty.
For the Body section:
- In the Body content type field, select application/json.
- In the Body input method field, select Data structure.
- In the Body structure field, click Add to create a new data structure.

- Enter a name for your data structure to distinguish it afterward. Click +Add item to set up the parameters as 'key-value' pairs.

- Alternatively, click Generate to enter a JSON text that will be converted into 'key-value' pairs. For example:
- Click Generate.
- This way, you'll add a title field to add the name of the spreadsheet you create, and a title field for the sheet created in that spreadsheet. Click Save.

- In the Body content field, you can now enter the names of the spreadsheet and sheet that you'll create.

Click Save and run the module.

You can now check your Google Sheets. A new spreadsheet called New spreadsheet Make with a New sheet will be created. You can also see it in the output:

Troubleshooting
If you get an error while establishing the OAuth 2.0 connection to any Google service in the HTTP > Make a request module, ensure that you've completed all the steps described above. Below is the summary of the key items you need to verify.
Check your Google Cloud Platform project
Required API is enabled: Ensure you've enabled the required Google API, as explained here.
Authorized domains are added: Add integromat.com and make.com as authorized domains in the Branding section, as explained in step 4 here.
Test user is added, or the app is published: Add your Gmail account as a test user or publish the app, as explained in step 5 here.
Authorized Redirect URI is added: Add the correct https://www.integromat.com/oauth/cb/oauth2 in the Clients section, as explained in step 4 here.
Check the connection settings of the HTTP > Make a request module in Make
Authorize URI and Token URI are correct: Use https://accounts.google.com/o/oauth2/v2/auth as Authorize URI and https://oauth2.googleapis.com/token as Token URI, as explained in step 4 here.
Required scopes are added: Add all the scopes needed for your HTTP request, as explained in step 4 here.
Correct Client ID and Client Secret are used: Enter the credentials you obtained from your Google Cloud Platform project, and ensure they match.
Scope separator is set to SPACE: Set the Scope separator to SPACE if you're adding more than one scope, as explained in step 4 here.