Create your first AI agent
In this guide, learn how to create your first agent in Make. The process includes these steps:
- Plan an agent so you have a framework to build from.
- Build the scenario where the agent lives.
- Configure the agent so it understands its job and how to do it.
- Add the agent's tools so it has the capabilities to perform its tasks.
- Add the agent's knowledge so it has additional context to tailor its responses.
- Test the agent so it performs as expected before going live.
Once you complete the steps, you'll have a working agent ready to use in your scenarios.
Plan your agent so you know what it does, the tools and knowledge it needs, and what triggers it, for example:
- What the agent does: Content marketing specialist who creates blogs for social media based on trending industry topics
- Tools: Google Drive, Airtable, LinkedIn, and Facebook modules
- Knowledge: The company style guide and product glossary
- Trigger: Google Sheets document with trending topics
In Make, your agent belongs to a scenario. To start building, sign in to Make and click Create scenario at the top.
Add a trigger
Your AI agent scenario typically starts with a trigger. A trigger is the module that starts the scenario and determines how the agent receives new requests or information.
To add a trigger module:
In the Scenario Builder, click the giant plus.
In the app search, enter the name of the third-party service you need, such as Gmail or Google Sheets, and click its app.
Select the module that corresponds to the action you need, for example, Watch Changes or Search Rows.
Click the module, configure it based on your requirements, and save.
Click the clock icon on the module.
In Schedule settings, configure how often the scenario runs.
The option to start the scenario immediately when new data arrives is only available in instant triggers, which are marked with an instant tag. For information on all scheduling options, see Schedule a scenario.
Click Save on the Scenario toolbar.
You've now added a trigger to the AI agent scenario.
Add more modules (optional)
Optionally, add more modules before the agent.
Certain use cases require additional modules, such as providing your agent information that frequently changes. Download file, web search, and chat message modules are examples of modules you can add.
To add more modules:
Click the plus icon next to the trigger.
In the app search, enter the name of the third-party service you need, and click its app.
Select the module that corresponds to the action you need.
Click the module and configure it based on your requirements.
Click Save.
Click Save on the Scenario toolbar.
Repeat steps 1-5 for any other modules you want to add.
Once the other modules ready, you can add the agent. Optionally, return to this step at the end to add a module after the agent.
Add your AI agent
To add the Make AI Agent (New) > Run an agent module to your scenario:
Click the plus icon on the right side of the last module in your scenario.
Search for Make AI Agent (New) and click the app.
Click the Run an agent module.
You've now added the Make AI Agent (New) > Run an agent module to your scenario. Next, configure its settings.
In the module settings of the Make AI Agent (New) > Run an agent module, configure the agent's AI provider and model, instructions, and other specifics.
Choose an AI provider and model
AI providers, such as Make's AI Provider, OpenAI, and Claude, connect your agent to large language models (LLMs). To choose your AI provider and model:
In Connection in the Make AI Agent (New) > Run an agent module, click Add to create a new AI provider connection, or select an existing one from the dropdown.
Select an AI provider connection from the Connection type dropdown.
If you're on a Free plan, select Make's AI Provider. If you're on a paid plan, select Make's AI Provider or a custom AI provider connection, such as OpenAI or Anthropic Claude.
Name the connection and configure the remaining fields. If the connection requires an API or access key, obtain the key from your AI provider account.
Click Save.
From the Model dropdown, select a model. The AI provider offers the models listed.
Models vary in processing speed, reasoning abilities, token costs, and effectiveness in specific tasks. Research the models available to decide which best fits your goals.
Your agent now has an AI provider and model for its decision-making.
Add instructions
Instructions tell the agent what its job is and how to do it. The agent follows these rules across all tasks and requests.
In Instructions, clearly and systematically outline the agent's role, behavior, goals, and the steps to achieve them.
Add inputs and files
Specify the inputs that the agent processes in each scenario run. Optionally, add input files to process with the inputs.
To add inputs and files:
In the Make AI Agent (New) > Run an agent (New) module, in Input, add any specific, one-time requests or mapped data from previous modules.
Optionally, in Input files, add the file that the agent receives from a previous module to process with its inputs:
- In File name, name the file to identify it later.
- In Data, click the text field and map the file from the module that downloads files.
File requirements
To input files to the agent, you must select Make's AI Provider, OpenAI, Anthropic Claude, or Gemini, and a model that supports files.
To learn more about supported file formats, see Input files for AI agents.
You've now added inputs and files to your agent.
Add additional specifics (optional)
In the remaining fields, configure any additional settings, such as:
- Conversation ID
- Maximum conversation history
- Step timeout
- Response format
To add these specifics:
In the Make AI Agent > Run an agent module, in Conversation ID, specify a custom ID so your agent remembers your interactions in a single thread and can reply to them.
Alternatively, map a thread ID or timestamp from a previous module, such as the thread ID of an email or Slack message.
If you leave the Conversation ID blank, the agent has no memory of your previous interactions and generates a new ID with each run.
Toggle Advanced settings for more setting options.
If you added a Conversation ID, specify in Maximum conversation history the maximum number of replies the agent remembers in the conversation.
In Step timeout, enter the maximum number of seconds an agent runs in each step before it fails. If you leave this field blank, the default time is 300 seconds (5 minutes).
In Response format, specify the response format that the agent returns.
- Select Text in the dropdown to return text as output.
- Select Data structure in the dropdown to return responses in a custom structure that you define.
Click Save.
You've now configured your agent. Adjust its settings at any time.
Give your agent modules, scenarios, MCP servers, and other agents to use as tools.
Add modules
A module is a built-in or third-party app that performs a specific action. Add modules as agent tools for one-step tasks, such as monitoring new customer contacts, sending emails, downloading files, or updating spreadsheets.
To add a module as a tool:
In the Scenario Builder, hover over the plus icon of the Make AI Agent (New) > Run an agent module, and click Add tool.
In the app search, enter the name of the third-party service you need, such as Gmail, and click its app.
Select the module for the action you need.
Click the module, configure it according to your requirements, and save.
Optionally, to filter outputs, click the Tool settings label on the route between the agent and module.
In Tool outputs, select the outputs to return to the agent.
Make automatically excludes internal metadata from the tool output. Re-include it now if the agent needs it.
You've now added a module as a tool for your agent.
Add scenarios
Scenarios are automated workflows consisting of multiple modules. Add scenarios as agent tools for more complex tasks that include several steps or third-party services.
You have two ways to add a scenario as a tool: choose an existing scenario or create a new one.
To choose an existing scenario:
In the Scenario Builder, hover over the plus icon of the Make AI Agent (New) > Run an agent module, and click Add tool.
In the app search, search for and click Scenarios.
Select the Call a scenario module.
Select an existing scenario from the Scenario dropdown.
If you want the scenario to return data to the agent, the scenario must end with a Return outputs module.
In Description, describe what the scenario does and when the agent uses it.
In Wait for the scenario to finish, select Yes if you want to wait for the called scenario to finish its run or return output before continuing this scenario's run.
Click Save.
You've now added an existing scenario as a tool for your agent.
To create a new scenario:
In the Scenario Builder, hover over the plus icon of the Make AI Agent (New) > Run an agent module, and click Add tool.
In the app search, search for and click Scenarios.
Select the Call a scenario module.
From the Scenario dropdown, click Create scenario.
Name your scenario, for example, "Watches new rows and sends emails."
Describe what the scenario does so the agent knows when to use it, for example, "Watches new rows in Google Sheets and sends a welcome email to new customers."
Define scenario inputs and outputs. Inputs are data parameters that the agent fills when it calls the new scenario, and outputs are data that the new scenario returns to the agent. Examples:
- Input items: Customer email address, first name, last name, email body, and row ID from a spreadsheet
- Output items: Email timestamp and success status
Click Create scenario.
In the new scenario, add the modules you need between the Scenarios modules.
Configure the added modules, including mapping the previously defined scenario inputs to the relevant fields.
In the Scenarios > Return output module, map the scenario outputs.
On the Scenario toolbar, toggle On demand to activate the scenario and allow the agent to call it when needed.
Click Save.
You've now added a new scenario as a tool for your agent.
Add MCP servers
Give your agent access to tools from third-party MCP servers when the actions that you want it to perform are unavailable through the standard Make apps.
To add an MCP server as a tool:
In the Scenario Builder, hover over the plus icon of the Make AI Agent (New) > Run an agent module, and click Add MCP.
In Connection, click Add to create a connection to an MCP server, or select an existing connection from the dropdown.
In Tools, select the MCP tools you want the agent to access, or click Select All to select all tools.
Multiple MCP servers and tools may result in high AI token usage. Limit MCP servers and tools to what the agent needs to perform its tasks.
Click Save.
You've now added an MCP server as a tool for your agent.
Add agents
Add other agents as tools if you want your agent to delegate tasks to sub-agents.
Agent nesting is limited to one level; a parent agent can have a sub-agent, but a sub-agent can't have another sub-agent.
To add an agent as a tool:
In the Scenario Builder, hover over the plus icon of the Make AI Agent (New) > Run an agent module, and click Add tool.
In the app search, find the Make AI Agent (New) > Run an agent.
In Tool settings, give the agent a name and a description in Tool name and Tool description.
The parent agent uses the sub-agent name and description to understand what the sub-agent does. It doesn't see the sub-agent's instructions or tools.
In Connection, click Add to create a new AI provider connection, or select an existing one from the dropdown.
In Model, select a model or Let AI Agent decide.
In Instructions, outline this agent's role and behavior.
In Input, select Let AI Agent decide.
In Input files, select Let AI Agent decide.
In Conversation ID, select Let AI Agent decide to generate a new conversation ID per run, or enter a specific ID to allow the parent agent and sub-agent to continue their conversation across runs.
Optionally, to filter outputs, click the Tool settings label on the route between the parent agent and this agent.
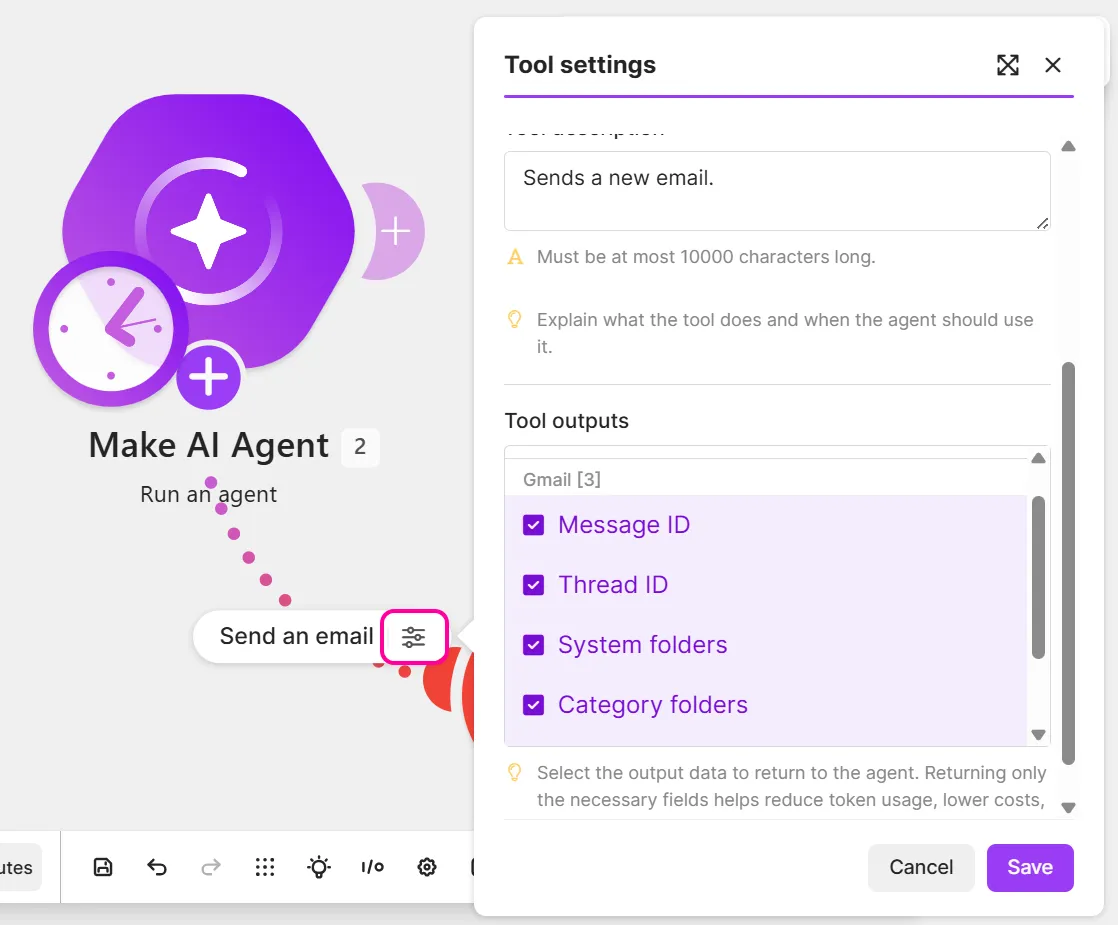
In Tool outputs, select the outputs to return to the parent agent.
Make automatically excludes internal metadata fields for sub-agent tools. You can re-include them in outputs or exclude other fields.
You've now added an agent as a tool for your agent.
Knowledge is reference information that the agent uses to tailor its responses to your goals. Knowledge files are typically static, such as company guidelines or glossaries. The agent stores files in a RAG vector database, retrieving relevant parts based on your request.
You have two ways to add knowledge files to your agent:
- Directly with the Make AI Agent (New) app for static files and a quick setup
- With the Knowledge app for files that update frequently
Before adding a file to your agent, give it a name that clearly decribes what it contains.
With the Make AI Agent (New) app
To add knowledge files directly with the Make AI Agent (New) app:
In the Scenario Builder, hover over the plus icon of the Make AI Agent (New) > Run an agent module, and click Knowledge.
In Knowledge files, click Upload files.
Click Choose file to select a file to upload. Supported file types include JSON, TXT, CSV, and PDF.
File upload consumes tokens for converting file content to vectors and generating file descriptions. Tokens vary based on file size.
Click Save.
Click the pencil icon next to your added file.
Optionally, in Description, edit the AI-generated description of your file, or leave it as is.
Click Save.
Toggle Advanced settings for more file settings.
Optionally, specify a search query that the agent uses to find information in your file, or allow the agent to decide the query (recommended).
Optionally, specify the number of results (relevant chunks of the file) the agent returns, or allow the agent to decide the number (recommended).
Click Save.
You've now added a knowledge file to the agent.
With the Knowledge app
You can add knowledge files with the Knowledge app in your main scenario, or in a separate one dedicated to uploading and managing knowledge.
To avoid uploading files each time the main scenario runs, create a separate scenario:
In a new tab, click Create scenario at the top.
In the Scenario Builder, click the giant plus.
In the app search, search for and click the name of the third-party service that downloads a file, such as Google Drive or Gmail.
Select the download file module, such as the Google Drive > Download a File module.
Configure the download file module settings and click Save.
Click Save on the Scenario toolbar.
Click Run once to get mappable data for later modules.
Click the plus icon next to the download file module.
In the app search, search for and click the Knowledge app.
Select the Upload knowledge module.
In File name, map the output value from the download file module that corresponds to the file name, for example, Name.
In File content, map the output value from the download file module that corresponds to the file content, for example, Data.
Click Save.
Click Run once to upload the knowledge file.
You've now added knowledge to your agent in a separate scenario.
Alternatively, to add knowledge with the Knowledge app in your main scenario, add the download file and Knowledge > Upload knowledge modules after the Make AI Agent (New) > Run an agent module.
Once you've created your agent, test how well it performs its tasks.
You have a few ways to test agents in Make:
- Chat with the agent
- Run the scenario
- Disable tools
- View previous scenario run details
Chat with the agent
Chat is an interface where you send sample requests to your agent to test its performance.
To chat with the agent:
Hover over the plus icon of the Run an agent app and click Chat, or right-click the Run an agent app and select Chat with Agent.
Enter a request, for example, "What is my recipe for this week?"
The agent calls the relevant tools and returns a response. If the called tools have a red error symbol, expand a tool and view its output.
Adjust your agent's settings, tools, or knowledge based on the results.
Return to the chat and resend the sample request.
Repeat steps 3-5 until the agent performs as expected.
You've now used chat to test your agent.
Run the scenario
Test your agent directly in the Scenario Builder using trigger data from previous scenario runs. To run the scenario with existing data:
In the Scenario Builder, click the downward arrow next to Run once.
From the Scenario run dropdown, select a previous scenario run to use for test data.
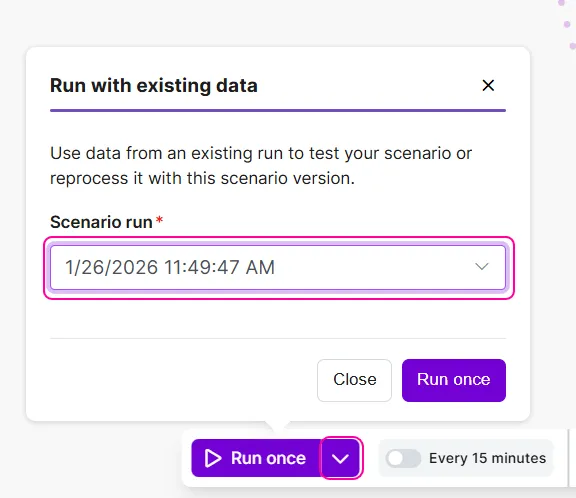
Click Run once.
Repeat steps 1-3 until the agent performs as expected.
You've now run your scenario using existing data.
Disable a tool
Disable one or more tools to check how the agent performs without them. The agent only calls enabled tools.
To disable a tool:
In the Scenario Builder, right-click the route of the tool you want to disable.
Click Disable tool.
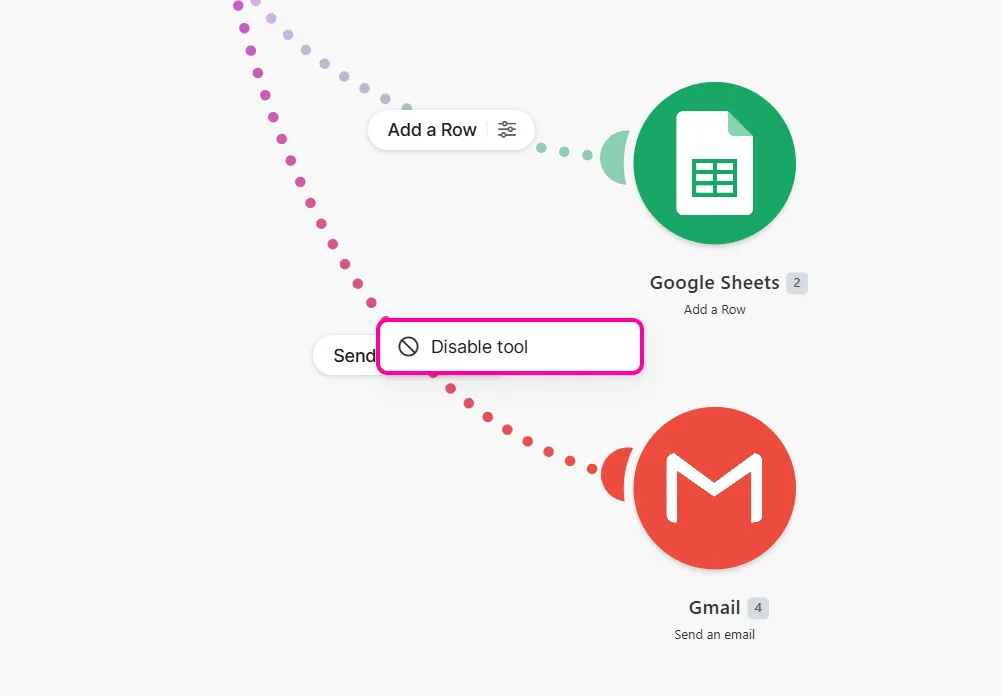
You've now disabled a tool. To enable it, right-click the same route and click Enable tool.
View scenario run details
View previous scenario runs in detail to understand how to resolve the errors that your agent or its tools return.
To view Scenario run details:
In the Scenario Builder, click the back arrow next to the scenario name.
Click History.
Next to the scenario run with an Error status, click Details.
In the Run details, click the output bubble.
To view outputs, expand an operation in the Output tab. Some key fields to focus on include Response and Metadata > Execution steps.
To view the agent's thought process, go to the Reasoning tab.
Adjust your agent's settings, tools, or knowledge based on what you discover.
You've now viewed scenario run details to understand how to resolve errors in your agent.
Once you've tested your agent, it's now ready to use in your scenarios.
Optionally, once you've created and tested your agent, you can duplicate or delete it.
Duplicate an agent to use it again in a scenario. You can do this by cloning or copying it:
- Clone to duplicate only the Make AI Agent (New) > Run an agent module
- Copy to duplicate the Make AI Agent (New) > Run an agent module and its tools
Clone your AI agent
To clone an agent:
In the Scenario Builder, right-click the Make AI Agent (New) > Run an agent module.
Click Clone.
Link the cloned Run an agent module to the scenario.
Click the module and adjust any of its settings.
Click Save on the Scenario toolbar.
You've now cloned your agent.
Copy your AI agent and its tools
To copy an AI agent and its tools:
In the Scenario Builder, press the Shift key while clicking the canvas.
Drag over the Make AI Agent (New) > Run an agent module and its tools.
Press Ctrl + C if you have Windows, or Command + C if you have a Mac.
Click the canvas.
Press Ctrl + V if you have Windows, or Command + V if you have a Mac.
Link the copied Run an agent module and tools to the scenario.
Click the Run an agent module and its tools, and adjust any of their settings.
Click Save on the Scenario toolbar.
You've now copied your agent.
Delete your AI agent
You have two ways to delete your agent: by deleting the Make AI Agent (New) > Run an agent module, or by deleting the scenario.
To delete the Run an agent module:
In the Scenario Builder, right-click the Make AI Agent (New) > Run an agent module.
Click Delete module.
You've now deleted the Make AI Agent (New) > Run an agent module. To add a new one, right-click and select Add a module.
To delete a scenario:
Click Scenarios on the left sidebar.
In the scenario list, find the AI agent scenario you want to delete.
Click the three-dot menu next to the scenario.
Click Delete.
You've now deleted the scenario.
Next, to walk through a guided use case, see Sales outreach AI agent use case.