Telegram-triggered AI agent
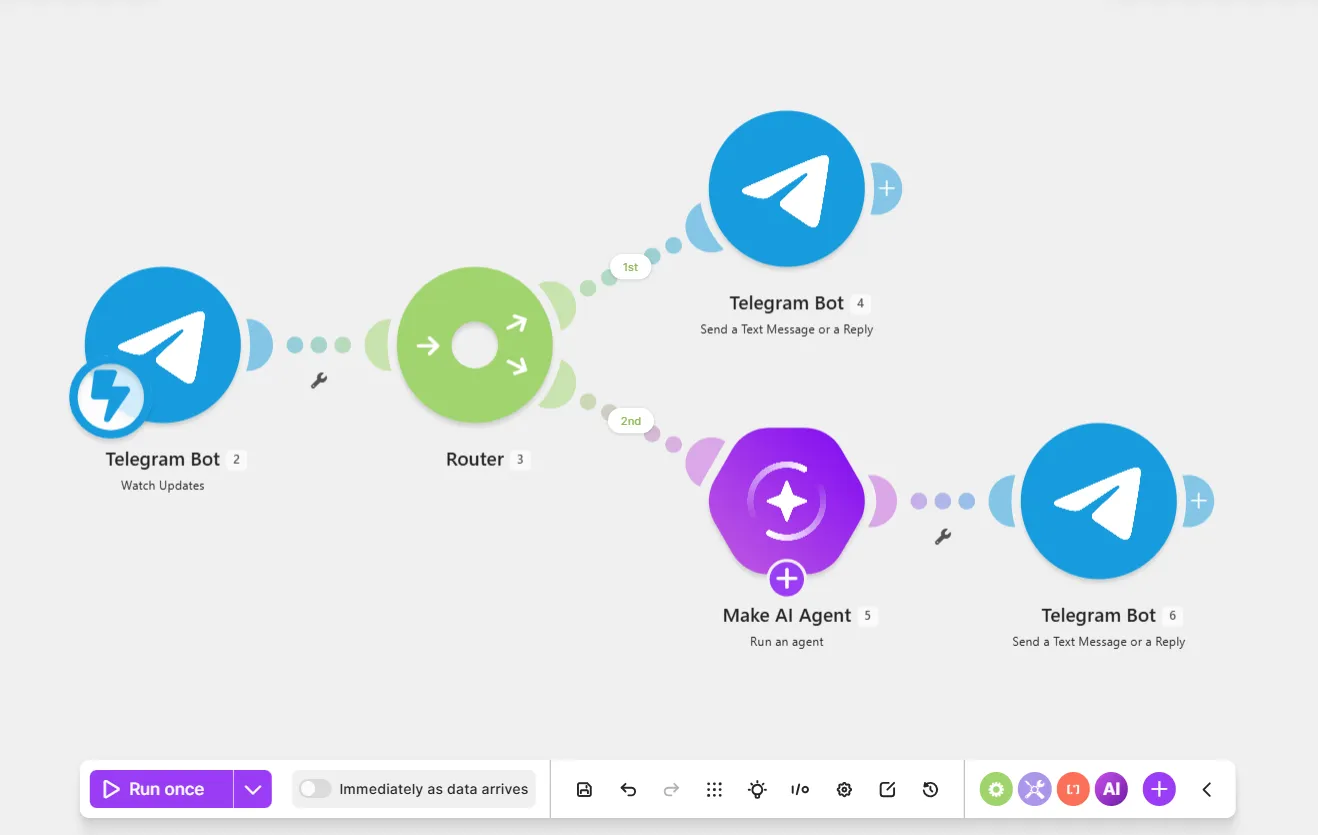
This Telegram-triggered AI agent scenario watches a Telegram Bot chat for new user messages and the agent replies to them.
Prerequisites
- A Telegram account
- A Telegram bot
- Your token (you'll use this when creating a webhook in Make)
Step 1. Add a Watch Updates module
The Telegram Bot > Watch Updates module watches for new messages from your bot channel in Telegram.
To add the Telegram Bot > Watch Updates module:
In the Scenario Builder, click the giant plus.
In the app search, search for and click Telegram Bot.
Click the Watch Updates module.
In Webhook name, name your webhook to identify it later.
In Connection, click Add to create a new Telegram Bot connection:
- In Connection name, name your connection to identify it later.
- In Token, paste the token you received when you created the Telegram bot.
- Click Save.
Click Save.
Click Save on the Scenario toolbar.
You've now added the Telegram Bot > Watch Updates module to your scenario.
Step 2. Add a route to reply to /start or non-text messages
When you start a conversation with a Telegram Bot, the bot sends a /start message to your scenario. As /start isn't a unique user message, you don't want it to trigger your agent.
Additionally, this example Slack scenario only accepts text, excluding non-text media, such as images, videos, or audio files.
Add a route that sends a welcome message in response to /start, or requests text-only messages in response to non-text messages.
To add a route:
Click the plus icon next to the Telegram Bot > Watch Updates module.
In the app search, search for and click Flow control.
Click Router.
Click the 1st route.
In Label, enter Welcome response.
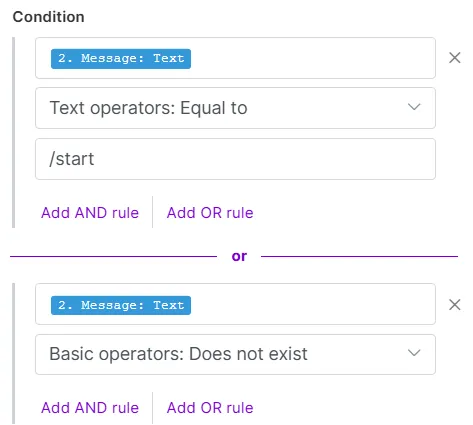
In Condition, configure the fields based on the following:
- Map the Message: Text value from the Telegram Bot > Watch Updates module.
- Text operators: Equal to
- /start
Make sure you've selected Message:Text here, rather than a similar value, such asEdited Channel Post: Text.
Click Add OR rule to add a second condition for non-text messages:
- Map the Message: Text value from the Telegram Bot > Watch Updates module.
- Basic operators: Does not exist
Click Save.
Click Save on the Scenario toolbar.
Click the giant plus next to the 1st route.
In the app search, search for and click Telegram Bot.
Click the Send a Text message or a Reply module.
In Connection, select the same Telegram Bot connection that you used earlier.
In Chat ID, map the Message: Chat: ID value from the Telegram Bot > Watch Updates module.
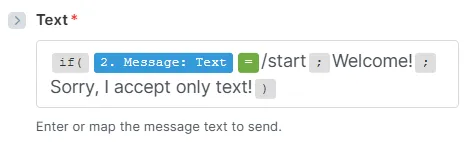
In Text, enter the following function, so when the message is /start, the agent replies "Welcome!", and when it's anything else, the agent replies that it only accepts text.
Click Save.
Click Save on the Scenario toolbar.
Test the module:
- Click Run once on the Scenario toolbar.
- In your Telegram Bot chat, click Start. This triggers the correct message as a reply.
You've now added a route that replies to /start or non-text messages.
Step 3. Add a route to reply to user messages
To add a route to reply to all other user messages:
Click the 2nd route.
In Label, enter "All other user messages."
Select Yes to Set the route as a fallback.
Click Save.
Right-click the Telegram > Send a Message or a Reply module and select Clone.
Move the cloned module down until it links to the empty giant plus, then unclick.
Right-click the empty giant plus and select Delete module.
In the cloned module, in Text, delete the function. Enter "Hello" and map the Message: Text value from the Telegram Bot > Watch Updates module.
Click Save.
Click Save on the Scenario toolbar.
Toggle Immediately as data arrives on the Scenario toolbar to activate the scenario.
To test the scenario, go back to your Telegram Bot chat and send a message to receive an agent reply.
You've now added a route to reply to user messages.
Step 4. Add a Run an agent module
To add the Run an agent module to the user message route:
Right-click the 2nd route and select Add a module.
In the app search, search for and click Make AI Agent (New).
Click the Run an agent module.
In Connection, select an existing AI provider connection from the dropdown or click Add to create a new one.
In Model, select a small model. Smaller models react quickly to new data, which is ideal for this chat-based AI agent.
In Instructions, describe who the agent is and what it does. For now, enter "You are a friendly agent."
In Input, map the Message: Text value from the Telegram Bot > Watch Updates module.
In Conversation ID, map the Message: Chat: ID value from the Telegram Bot > Watch Updates module.
In Telegram, each user has their own Message: Chat: ID. The agent uses it to remember the conversation history with the user and answer any follow-up questions.
As users chat more with your Telegram-triggered agent, storing all past messages can get expensive. To reduce tokens, you can set this field to start fresh conversations periodically (like using a timestamp), so the agent remembers less.
You've now added the Make AI Agent (New) > Run an agent module to the scenario.
Step 5. Add the agent response
To finish this scenario, map the agent response in the Telegram Bot > Send a Text Message or a Reply module to allow the agent to reply to the user message.
To add the agent response:
In the Telegram Bot > Send a Text message or a Reply module on the 2nd route, in Text, delete the existing text and map the response value from the Make AI Agent (New) > Run an agent module.
Click Save.
Click Save on the Scenario toolbar.
You've now created a Telegram-triggered AI agent scenario.