Sales outreach AI agent use case
In this guide, you'll create a sales outreach agent step by step in Make. Your agent will:
- Watch your Gmail for new emails labeled as leads
- Analyze the email content to decide whether the lead is a potential sales opportunity
- Research the lead with web scraping to learn more about the lead company
- Qualify the lead based on the information gathered
- Check your calendar availability for a meeting if the lead qualification score is high
- Draft a personalized email to the lead
- Sends the email draft to you on Slack
Overview
You'll follow these steps to build your agent:
- Build your AI agent scenario
- Add tools
- Test your AI agent
- Finish with a Slack module
Once you complete the steps, you'll have a sales outreach agent that you can use or extend further, depending on your goals.
Later, you can tailor this agent to your company guidelines by adding knowledge, as shown in the video.
Prerequisites
You must set up the following before you build your agent:
- A Gmail account with a label for lead emails called "Leads" or similar
- A Slack account with a private channel called "Leads" or similar
- Google Calendar
Typically, an external system, such as a form or CRM tool, would automatically send lead emails to your Gmail. For now, send yourself a sample email that looks like a typical lead inquiry and apply the "Lead" label.
Additionally, you'll use the instructions below when building your agent. Copy them now so you're ready to give them to your agent in Step 1.
To start building, sign in to Make and click Create scenario at the top.
Add a Gmail trigger
The Gmail > Watch emails module triggers the scenario where your agent lives. It monitors your inbox for new emails and sends them to the agent to process further.
To add the Gmail > Watch emails module:
In the Scenario Builder, click the giant plus.
In the app search, search Gmail, and select Watch emails.
Click the module to open its settings.
In Connection, select an existing Gmail connection from the dropdown or click Add to create a new one.
In Filter type, select Simple filter.
In Folder, select All mail.
In Label, select the label you set up in Gmail for lead emails, such as Leads.
In Criteria, select All messages.
In Limit, specify the number of emails to return in each run, such as 5 or 10.
In Content format, select Full content.
Click Save.
In the dialog, select the point in time from which to process your inbox data. For example, to process only new emails from now on, select From now on.
Once you test this scenario, you can choose when to start processing inbox data at any time. Right-click the Gmail > Watch email and select Choose where to start.
Click the clock icon on the module to schedule the scenario.
In Schedule settings, specify how often your scenario runs, for example, every day at 9:00.
Click Save on the Scenario toolbar.
Click Run once on the Scenario toolbar to retrieve email data that you'll map this data in later modules.
You've now added the Gmail > Watch emails module to your AI agent scenario.
Add a Make AI Agent (New) module
Next, add the Make AI Agent (New) > Run an agent module to your scenario:
Click the plus icon next to the Gmail > Watch emails module.
Search for Make AI Agent (New) and click Run an agent.
In the Run an agent module settings, in Connection, select an existing AI provider connection from the dropdown. Alternatively, click Add to create a new one.
In Model, select a model.
In Instructions, add the copied instructions from prerequisites to this field.
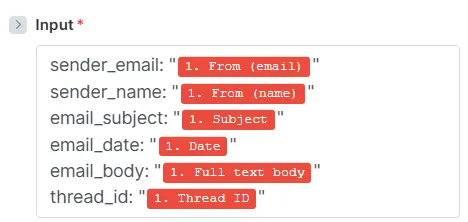
In Input, copy the below input items and add them to the field. These items are email data you want the agent to work on.
sender_email: "{{1.fromEmail}}" sender_name: "{{1.fromName}}" email_subject: "{{1.subject}}" email_date: "{{1.internalDate}}" email_body: "{{1.fullTextBody}}" thread_id: "{{1.threadId}}"
Replace the placeholders between the quotation marks: map the output values from the Gmail > Watch emails module that correspond to each input item.
Once done, the Inputs field looks like this:
Toggle Advanced settings.
In Response format, select Data structure from the dropdown.
In Response structure, click Add item.
In Name, enter "draft_mail_id."
In Label, enter "Mail ID."
In Description, copy the following instructions and add them to the field. They tell the agent to take the draft email id.
After creating the draft mail, you'll get back a JSON like: { "draftId": "r7956931764211347721", "id": "19b46f571debca3f", "threadId": "19b46f571debca3f", "labelIds": [ "DRAFT" ], "sysFolders": [ { "id": "DRAFT", "name": "Draft" } ] } Pass here the "id" item of the JSON. In the example is "19b46f571debca3f"
Click Save.
Click Save on the Scenario toolbar.
You've now added the Make AI Agent (New) > Run an agent module to your scenario. You'll finish the scenario with a Slack module in a later step.
Your sales outreach agent uses three modules as tools:
- Google Calendar > Get Free/Busy Information: Checks your calendar for your meeting availability
- Make AI Web Search > Generate a response: Researches the company associated with the lead email address
- Gmail > Create a draft email: Creates an email draft based on the content of the lead email
Add a Google Calendar module
To add the Google Calendar > Get Free/Busy Information module to your agent:
Hover over the plus icon on the Run an agent module and click Add tool.
In the app search, search for and click Google Calendar.
Select the Get Free/Busy Information module.
In the Connection dropdown, select an existing Google connection or create an new one.
In Time Range From, map the Date value from the Gmail > Watch emails module. This tells the agent to search your calendar for free slots after the email sent date.
In Time Range To, select Let AI Agent decide. Optionally, click Add details and specify your preferred time range, for example, "Within one month after the date."
In Calendars, select Let AI Agent decide.
Click Save.
Click Save on the Scenario toolbar.
You've now added a Google Calendar > Get Free/Busy Information module to your agent.
Add a Make AI Web Search module
To add the Make AI Web Search > Generate a response module to your agent:
Hover over the plus icon on the Run an agent module and click Add tool.
In the app search, search for and click Make AI Web Search.
Select the Generate a response module.
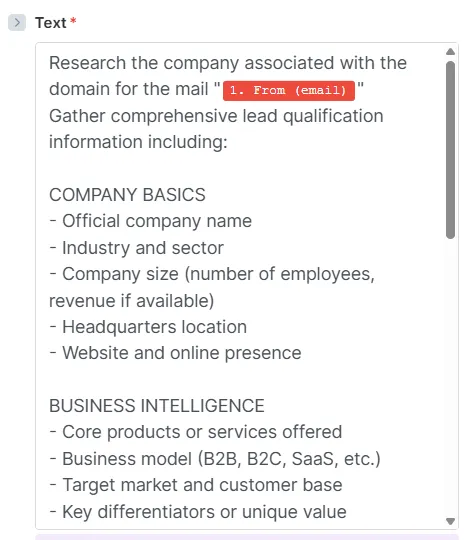
In Text, copy the following instructions and add them to the field.
Research the company associated with the domain for the mail "{{1.fromEmail}}" Gather comprehensive lead qualification information including: COMPANY BASICS - Official company name - Industry and sector - Company size (number of employees, revenue if available) - Headquarters location - Website and online presence BUSINESS INTELLIGENCE - Core products or services offered - Business model (B2B, B2C, SaaS, etc.) - Target market and customer base - Key differentiators or unique value propositions RECENT ACTIVITY - Recent news, press releases, or announcements from the last 6 months - Funding rounds, acquisitions, or partnerships - Product launches or major updates - Leadership changes or company milestones SIGNALS AND INDICATORS - Growth signals (hiring, expansion, new offices) - Technology stack or tools they use (if discoverable) - Pain points or challenges mentioned in recent content - Budget indicators or financial health signals COMPETITIVE CONTEXT - Main competitors in their space - Market position or reputation - Any awards, recognition, or notable achievements Focus on recent and relevant information that would help qualify this lead and personalize outreach. Prioritize facts over speculation.
Replace the {{1.fromEmail}}placeholder between the quotation marks: map the From (email)output value from the Gmail > Watch emails module.
Once done, the Text field looks like this:
Click Save.
Click Save on the Scenario toolbar.
You've now added the Make AI Web Search > Generate a response module to your agent.
Add a Gmail module
To add the Gmail > Create a draft email module to your agent:
Hover over the plus icon on the Run an agent module and click Add tool.
In the app search, search for and click Gmail.
Select the Create a draft email module.
In the Connection dropdown, select an existing Google connection or create an new one.
In To, map the output value from the Gmail > Watch emails module that corresponds to the sender address: From (email).
In Subject and Content fields, select Let AI Agent decide.
Click Save.
Click Save on the Scenario toolbar.
You've now added the Gmail > Create a draft email module to your agent. Next, test how well the agent works so far.
To finish your AI agent scenario , add a Slack > Send a Message module that sends the link to the email draft to your private Slack channel for leads.
To add the Slack > Send a Message module:
Click the plus icon next to Make AI Agent (New) > Run an agent module.
In the app search, search for and click Slack.
Select the Send a message module.
In Connection, select an existing user Slack connection or create an existing one.
In Channel type, select Private channel.
Select the private Slack channel that you created for leads.
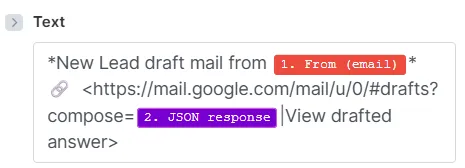
In Text, copy the following instructions and add it to the field. This text includes a link to the email draft.
New Lead draft mail from {{1.fromEmail}} 🔗 <https://mail.google.com/mail/u/0/#drafts?compose= {{2.jsonResponse}} View drafted answer>
Replace the placeholders between the quotation marks:
- {{1.fromEmail}}: Map the From (email) output value from the Gmail > Watch emails module.
- {{2.jsonResponse}}: Map the JSON response output value from the Make AI Agent (New) > Run an agent module.
Once done, the Text field looks like this:
Click Save.
Click Save on the Scenario toolbar.
Click Run once to check whether you receive the message in your lead Slack channel.
You've now added a Slack > Send a message module to your scenario.
You've now created a sales outreach agent that helps you qualify and contact leads.
Next, to build agents just like this one with pre-built templates, see Make AI agents library.