Mailhook-triggered AI agent
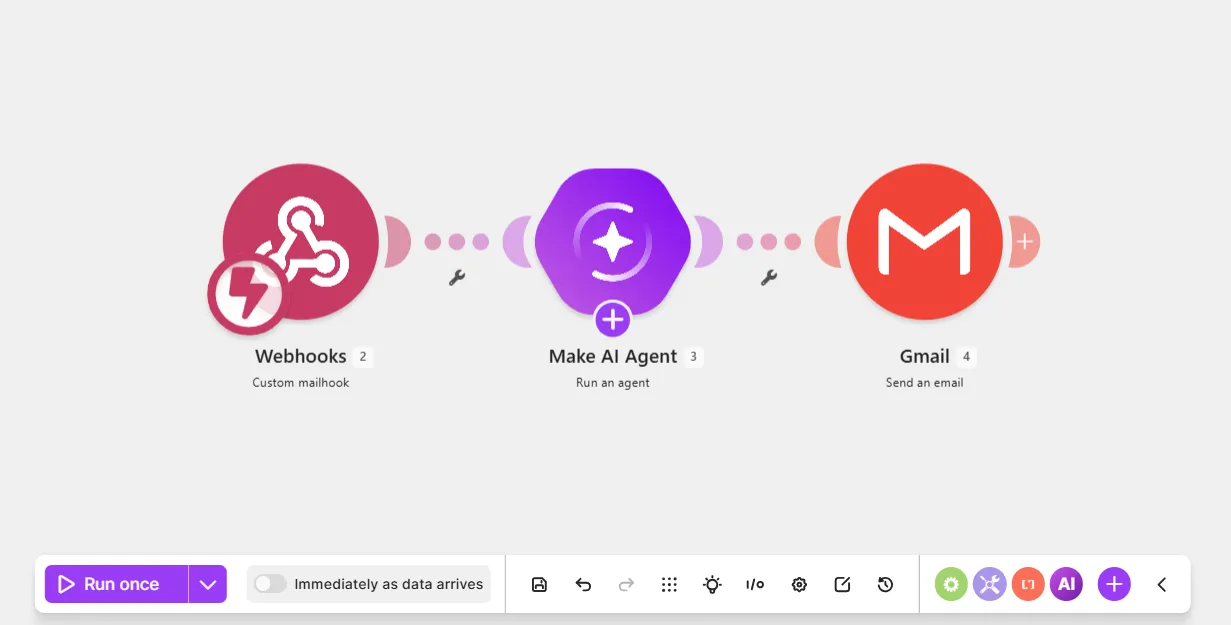
This mailhook-triggered AI agent scenario watches for new emails, and the agent replies to them. Mailhooks (email webhooks) immediately trigger scenarios in response to new emails, rather than on a scheduleon a schedule.
Prerequisites
- Two email accounts, such as a business email address and a personal email address
This example uses Gmail. If you have a different email provider, see its documentation for equivalent settings in the relevant steps.
Step 1. Add a Custom mailhook module
The Webhooks > Custom mailhook module generates an email address (mailhook) that your email provider forwards new emails to, triggering the scenario.
To add a Custom mailhook module:
In the Scenario Builder, in the top-left corner, name your scenario and click Save.
Click the giant plus.
In the app search, search for and click Webhooks.
Select the Custom mailhook module.
In the module settings, in Mailhook, click Add.
In Webhook name, name the mailhook. For example, use the scenario name.
Click Save. You'll now see the generated mailhook to use in later steps.
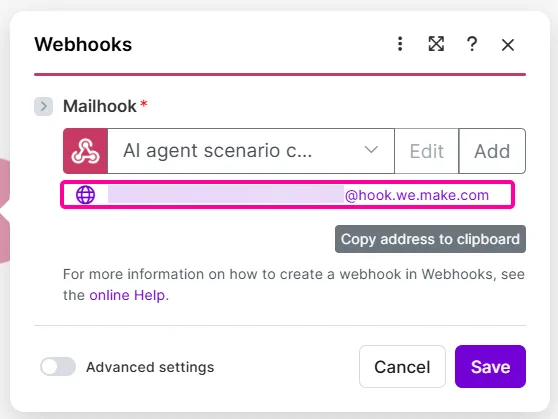
Copy the address to your clipboard and click Save. You'll later update your email settings to forward emails to it.
Click Save in the Scenario toolbar.
You've now added a Webhooks > Custom mailhook module.
Step 2. Add your mailhook as a forwarding email
In the email account where new emails trigger the scenario, add the mailhook as a forwarding address so your email provider sends new emails to it.
To add the mailhook as a forwarding address:
Open your Gmail account.
Click the Settings icon in the top-right menu, and click See all settings.
Go to the Forwarding and POP/IMAP tab.
Click Add a forwarding address.
Paste the mailhook that you copied earlier.
Agree to proceed in all remaining steps.
You've now added the mailhook as a forwarding address in Gmail.
Step 3. Create an email filter
To send only specific incoming emails to the mailhook, rather than all emails, create a filter in Gmail.
To create an email filter:
In Settings in your Gmail account, go to the Filters and Blocked Addresses tab.
Click Create a new filter.
In From, enter the email address associated with the email account that you're in now.
Use your own email address so you can send yourself an email and reply to it. Your email reply passes an important header into Make called references that you must map later in the scenario.
Click Create filter.
Select Forward it to: and select the mailhook that you added in the previous step.
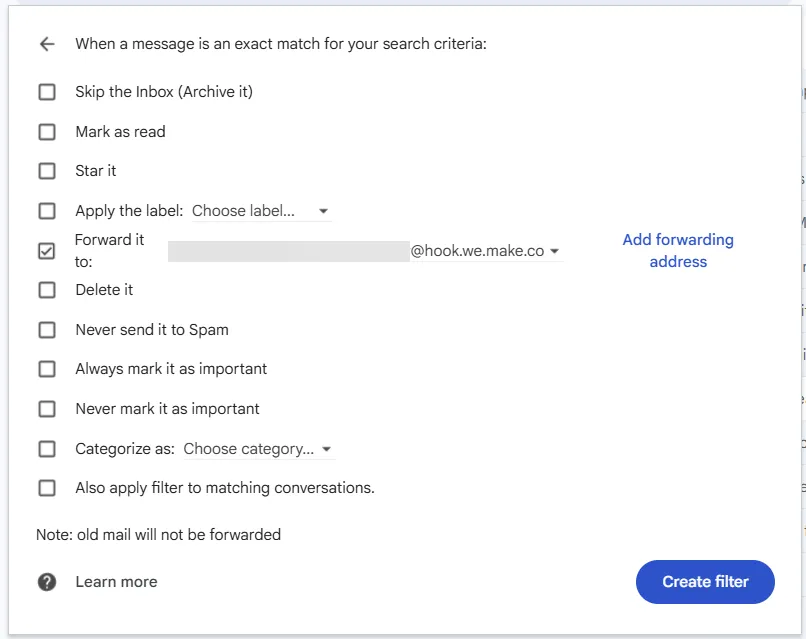
Click Create filter.
You've now created an email filter, so only specific emails go to the mailhook.
Step 4. Send a test email to the Custom mailhook module
To test that your Custom mailhook module receives forwarded emails from Gmail:
In the Scenario Builder, click Run once on the Scenario toolbar.
In Gmail, send yourself an email.
Once the mailhook receives the email, you can click the output bubble of the Custom mailhook module to view the email properties, such as headers.
You've now sent a test email to yourself. Next, reply to it.
Step 5. Reply to the test email
Reply to the first test email to pass headers that are only available in email replies —in-reply-to and references—into the scenario for mapping. You'll need these values for replying to emails.
To reply to the test email:
Click Run once on the Scenario toolbar.
Go to your Gmail account.
Reply to the email that you sent yourself.
Once the mailhook receives the email, click the output bubble to expand Headers and view the values you'll use in later steps:
- message-ID: The unique ID of an email
- in-reply-to: The message ID of the email being replied to
- references: A list of message IDs in a single thread of emails, with the first ID being the initial email
The Webhooks > Custom mailhook is complete now that it has reply email output data.
Step 6. Add a Run an agent module
To add the Make AI Agent (New) > Run an agent module:
Click the plus icon next to the Webhooks > Custom mailhook module.
In the app search, search and click Make AI Agent (New).
Click the Run an agent module.
In Connection, select an existing AI provider connection from the dropdown or click Add to add a new one.
If you don't want to create an account with an AI provider, select Make's AI Provider.
In Model, select a model from your chosen AI provider.
In Instructions, describe who the agent is and what it does. Alternatively, copy-paste the following: You are a helpful agent who replies to emails.
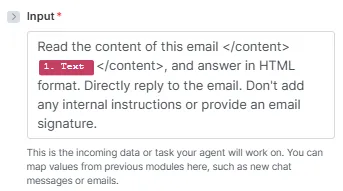
In Input, tell the agent to read the email content and answer in HTML. You can copy-paste the following:
Read the content of this email </content> Text </content>, and answer in HTML format. Directly reply to the email. Don't add any internal instructions or provide an email signature.
While optional, XML tags (</content>) clearly separate data (Text) from the rest of the instructions.
Replace Text with the Text value from the Webhooks > Custom mailhook module.
In Conversation ID, enter the following function: ifempty( first( split( Headers: references; space ) ) ; Headers: message-id)
This function uses the first message ID listed in the reference header, and if empty, uses the message ID. The split(splits the reference array into individual values and the first( uses the first value.
Replace the text in the function (Headers: reference and Headers: message-id) with the corresponding values from the Webhooks > Custom mailhook module.
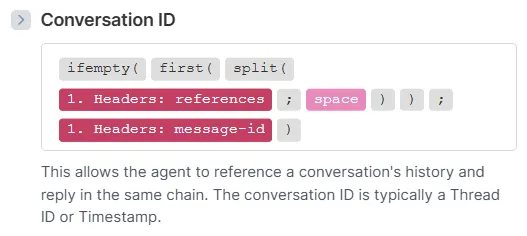
Click Save in the Scenario toolbar.
You've now added a Run an agent module.
Step 7. Add a Send an email module
The Gmail > Send an email module replies to emails with agent-generated answers from the Make AI Agent (New) > Run an agent module.
To add a Send an email module:
Click the plus icon next to the Make AI Agent (New) > Run an agent module.
In the app search, search for Gmail and click Send an email.
In the module settings, in Connection, select the Gmail connection that you used to create the mailhook.
In To, map the Sender: Email address value from the Webhooks > Custom mailhook module.
In Subject, map the Subject value from the Webhooks > Custom mailhook module.
In Body type, select Raw HTML because you requested HTML in the agent instructions.
In Content, map the Responsevalue from the Make AI Agent (New) > Run an agent module.
Toggle Advanced settings.
In Additional email headers, add these email headers:
- Email header 1:
- In Key, enter in-reply-to.
- In Value, map the Headers: message-id value from the Webhooks > Custom mailhook module.
- Email header 2:
- In Key, enter references.
- In Value, map the Headers: references and Headers: message-id values from the Webhooks > Custom mailhook module.
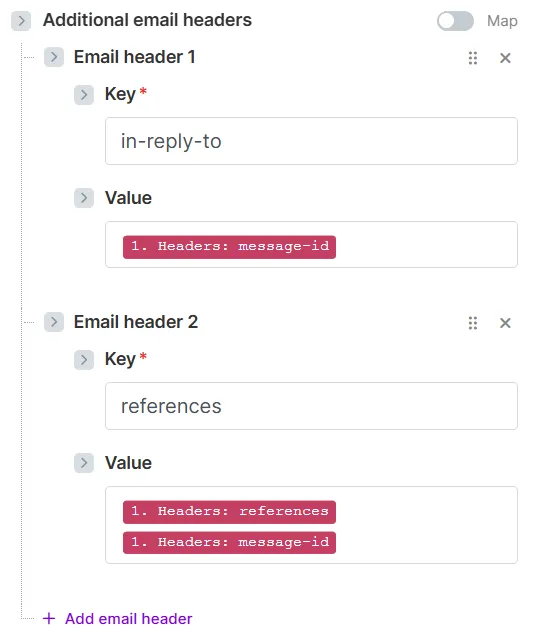
Click Save.
Click Save on the Scenario toolbar.
Your email webhook-triggered AI agent scenario is now ready to test again.
Step 8. Update the email filter and test it
Based on your current email settings, Gmail forwards emails from yourself—including agent replies to them—to the mailhook.
To prevent an infinite loop, where each agent reply triggers the scenario, add a different email address to your email filter, such as your personal email address, and test it from that account.
To update the email filter and test it:
In Gmail, click the Settings icon, and click See all settings.
Click Filters and Blocked Addresses.
Find your existing email filter and click edit.
In From, add a different email address.
Click Continue, then click Update filter.
In the email account associated with the new address, send an email to the original email address.
In the Scenario Builder, click Run once on the Scenario toolbar to test if agent replies work.
Return to the account associated with the new email address. You now have an email thread with the initial email (1) and the agent reply (2).
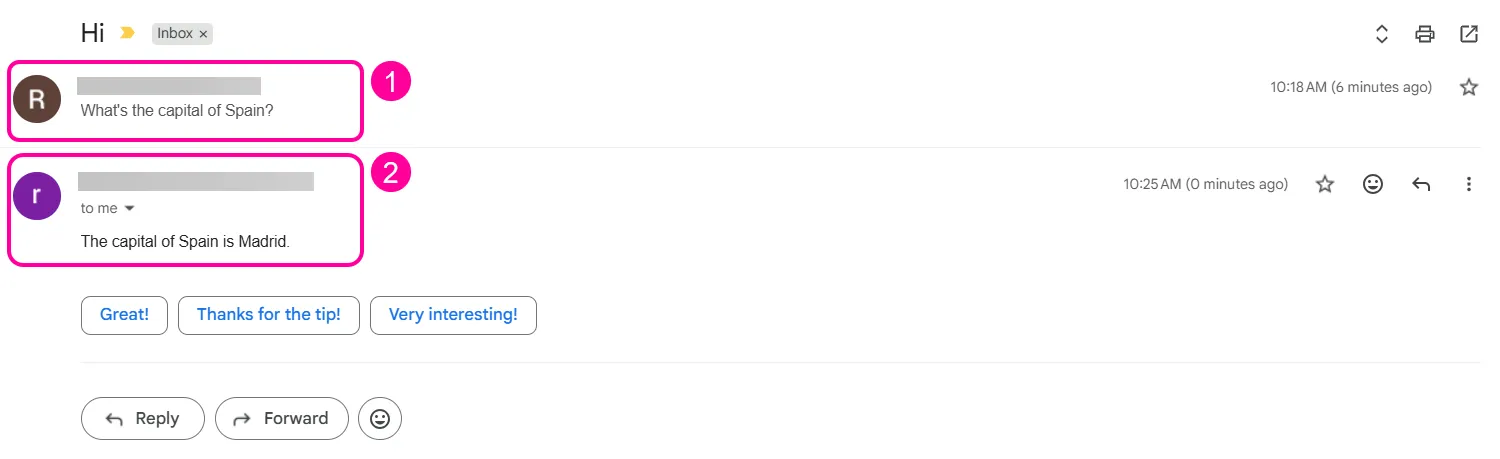
You've now created a mailhook-triggered AI agent scenario, where your target email account forwards emails to a mailhook, and the agent immediately replies to them.
Next, you can tailor the email filter with additional specifics, depending on your use case.